
If you ask any veteran astronomer they will tell you every telescope is a travel telescope if you try hard enough. But for beginners, that’s just not realistic. Some of us just want a small device that we can drop on a backpack and take on a quick hiking trip without breaking our backs in the process.
In this article, I’ll take a look at what makes a good portable telescope, how to choose one, and offer some recommendations based on my almost 15 years of experience in the stargazing hobby.
If you want to skip directly to the picks, use the button below.
What is a travel telescope
It is hard to define exactly what constitutes a travel telescope because each person’s needs are different. The dimensions, weight, and features that should be considered to form part of this category vary from person to person, but in general terms, here’s what I think is a good definition.
A small travel telescope should have an aperture no bigger than 120mm (4.7″). It must weigh less than 20lb (9kg) when fully assembled and it needs to fit comfortably into a backpack or a shoulder carry bag.
While larger telescopes will always have more power because of the bigger aperture, these smaller options are a perfect fit for many use cases, for example:
- Hiking
- Camping
- Cramped observing spots, like a balcony
- As a children’s telescope they can set up themselves
- As a beginner’s telescope for people that just want to try owning a telescope to see if they like it
The mount or tripod is also going to play an important factor in the portability of a telescope as they can account for 2/3 of the total weight in some cases.
There are some handheld telescopes that can be used without a mount, however, those are mostly used for nature watching and maybe just looking at the Moon. For stargazing a tripod is necessary because when you are working with high magnifications even the slightest hand movement can make you lose sight of the planet or galaxy you are trying to target.
An expandable or modular tripod made of lighter materials is preferred for traveling.
How to choose a portable telescope
There are a few important factors to consider when choosing a travel telescope aside from its size. You have to find a good balance between power and portability. That equilibrium can be hard when it comes to telescopes as they are mostly built to remain static and stable in order to perform optimally.
Here are the aspects you need to consider when selecting a small portable scope.
Aperture
The most important feature when choosing any telescope is the aperture. The aperture is the diameter of the front lens, generally given in millimeters. Assuming a similar build quality, a telescope with a larger aperture is always going to outperform a smaller one. Check out this comparison of different apertures for reference.
We generally recommend picking the largest aperture you can afford, however, for a travel telescope, things can get tricky because that is going to mean increasing the weight and size too. You will need to find the right balance between power and portability.
My personal recommendation is that for a camping telescope you shoot for an aperture between 70mm and 120mm (2.7″ to 4.7″). Anything larger than that is just too inconvenient, heavy, and takes too much space.
For hiking telescopes, 50mm to 90mm is the optimal aperture because you will need to carry it on your back all the time. I’d also recommend using a tabletop tripod instead of a full-size one.
Weight
Telescope tubes are made of many different materials. Some are made out of plastic, others use carbon fiber or fiberglass, but most are made out of metals like rolled aluminum or steel.
Plastic tubes are light, but they tend to be flimsier. Carbon fiber has the best durability to weight ratio, but it’s very expensive and it doesn’t make enough of a difference to be worth it. That leaves us with aluminum as the best option although as you will see in the list below, we will also consider some plastic options that are worth taking a look at.
There are other two parts that add weight. The main mirror and the mount.
The weight of the mirror or lens can increase quickly as the aperture grows because it scales volumetrically (thickness also needs to increase to make it stable). A single 5″ (127mm) main telescope mirror can weigh 2.2 pounds (1 kg) by itself which doesn’t sound like much but it adds up when you sum all the parts.
Finally, the mount. If you have read other guides on the site you will know that for most telescopes I recommend stainless steel mounts because they are sturdier than other options, but for the portable category, I’m going to make an exception because they are considerably heavier. Aluminum mounts are good enough for this particular use case.
Transportation and activity.
One important thing to consider is where do you plan to take the telescope and what do you plan to do while you are there.
Going hiking, camping, flying, or driving are all going to present different challenges. For example, if you are going camping, you will only need to carry the telescope from the car to the campsite a few feet. But if you are hiking, you will have to plan for carrying the telescope on your back under the Sun for several hours so every pound is going to matter more.
Size
Obviously, size is going to be important for portability. But when it comes to stargazing, this is going to reduce the types of telescopes that are a good fit.
Focal length is an important number for any optics device. It is basically the distance the light travels from the entry mirror to the eye. This means the length of a telescope isn’t just arbitrary, but it affects the image you get.
A short focal length isn’t a bad thing, in fact, it is better for deep space observing (galaxies, nebulas, etc) but the amount of those objects you might be able to see with the smaller apertures of travel telescopes might be limited.
This means most of your search will be limited to refractor telescopes that have a straightforward focal length, meaning the size of the tube is equal to its focal length. There are some more sophisticated types that have longer focal lengths on a compact body, those are called compound telescopes and the most popular ones are Maksutov-Cassegrain and Schmidt-Cassegrain.
Maintenance
Some telescopes require a mirror re-alignment every once in a while. This is called “collimation” and while it’s not too difficult and everyone can learn to do it, you don’t want to get to your camping trip and realize your telescope needs to be collimated and waste the next half hour doing so instead of looking at the stars.
For most telescopes that require collimation this needs to be done once a year or so, but moving the telescope around increases the chances of the mirrors moving and requiring to be re-aligned more often, so a telescope that is low maintenance and doesn’t require collimation might be more suitable for trips.
The types of telescopes that DO NOT require collimation are refractors and Maksutov-Cassegrain.
The telescopes that do require collimation are Newtonians (reflectors), Dobsonians, and Schmidt-Cassegrain (although collimating a Schmidt’s is extremely easy and only takes about 5 minutes).
Weather conditions
While the weather will always be a factor when you are planning any type of outdoor trip, when it comes to stargazing, it is more of a yes or no situation.
You will simply not be able to use a telescope under rain or snow. While using a cover would technically allow you to use it under those weather conditions, the real problem is the clouds blocking the view of outer space. If there is a high chance rain will occur during your trip, it might be best to simply leave your scope at home.
Still, if the weather conditions are uncertain and you want to bring it anyway, maybe consider not getting a telescope with electrical components like computerized mounts or make sure the travel bag is impermeable.
Best travel telescopes
Methodology and credentials
All the recommended telescopes have been personally used and tested by me. I do not own any of the equipment below because I’m more of a backyard stargazer, but I’ve been able to borrow them through my local stargazing club and friends in order to try them.
I’ve been looking at the sky since I was a child, and have several years of experience testing products for this site. You can read more about my credentials on the about us page.
I have split the recommended devices into categories depending on their respective use cases. They are only compared to instruments of similar quality, size, and design because it would be unfair to pit them against more powerful but less mobile options.
I tested all of them using the same eyepieces, Barlow lenses, and accessories to try and remove those as variables that could affect the quality of the image.
About the specifications
If you are a complete beginner, here’s a quick rundown of the meaning of each specification you will see listed below:
- Aperture: Diameter of the front mirror/lens.
- Focal length: Distance the light has to travel from the front mirror to the focuser.
- Limiting magnitude: Maximum star “brightness” the telescope can see. Higher is better.
- Max useful magnification: Highest magnification the telescope can reach before the image gets blurry or disorted.
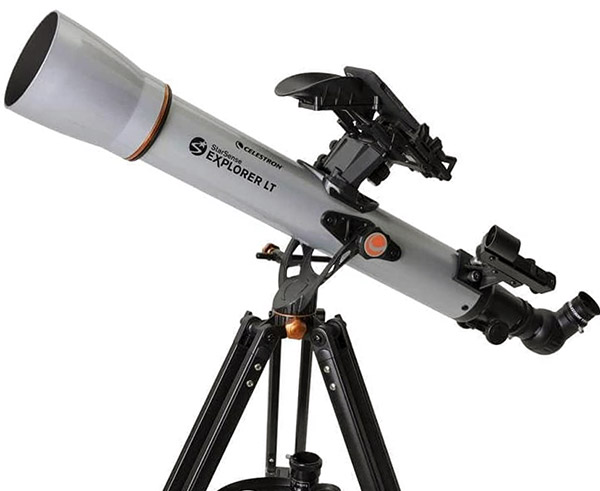
Best travel telescope for beginners: Celestron Starsense 80AZ
| Manufacturer | Celestron |
| Model | Starsense 80AZ |
| Type | Refractor |
| Aperture | 80mm (3.14″) |
| Focal length | 900mm |
| Assembled weight | 9.2 lbs (4.1kg) |
| Limiting magnitude | 12.0 |
| Max useful magnification | 189x |
| Accessories | 25mm and 10mm eyepieces, 2x Barlow lens, smartphone adapter, starsense |
| Price |
The Starsense technology that Celestron has incorporated into their beginner’s line is incredibly useful for people getting into the hobby.
It works by setting your phone on an adapter that is placed at the top of the tube. Open the StarSense app and point the telescope to the sky. The app will be able to recognize your position based on the stars and will map out the rest of the visible night sky.
After that, simply use the search function to look for any planet, galaxy, constellation, star cluster, or thousands of other objects in the database. The app will guide you through the view and help you find the object you are looking for. It’s super simple and even seasoned astronomers find it helpful.
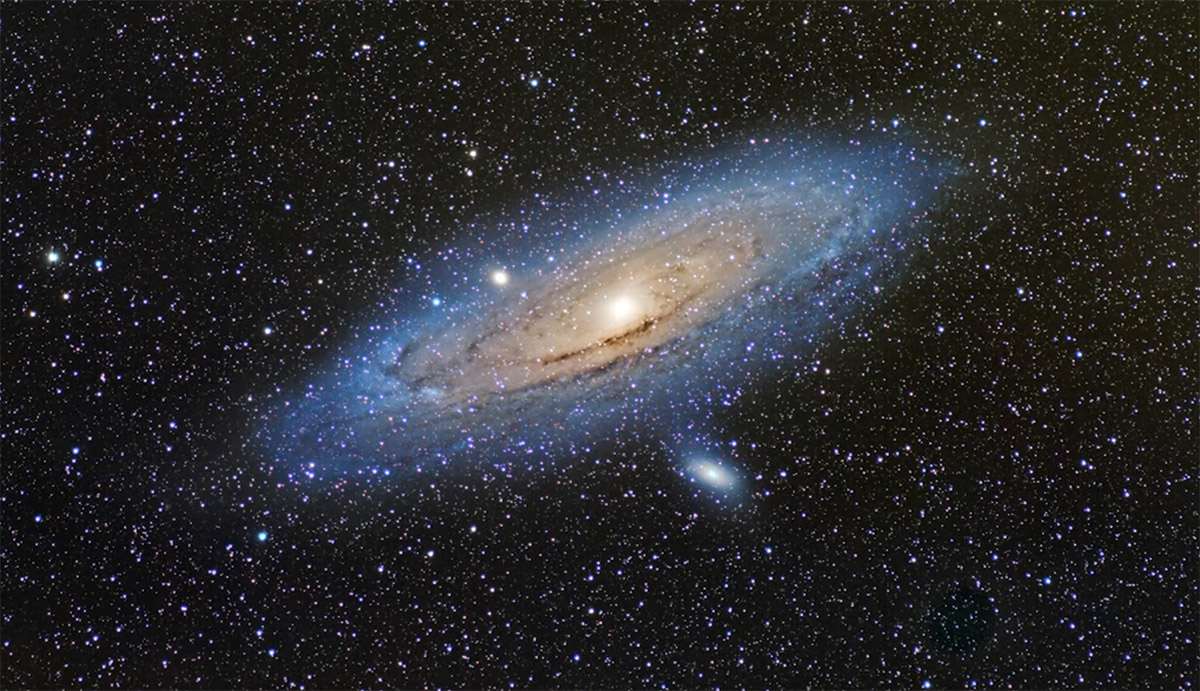
As for the optics, it is a very standard 80mm refractor. It’s great for looking at the Moon and you should be able to see Mars, Venus, Jupiter, and Saturn along with its rings. For deep space objects, you can see some star clusters, galaxies, and nebulas but don’t expect to get much detail. Check out the photos in our article on what to expect out of 70mm telescopes for some references.
If you want a bit more power than an 80mm, there’s a 102mm version that also comes with better coating on the mirror, a slightly better mount, and a shorter focal length. All that adds about 5 pounds so it’s up to you to decide if that’s a good tradeoff for your needs.
The included eyepieces are Kellners. They are fine and perform reasonably well, but you might eventually want to upgrade and get a pair of Plossls.
The mount is an alt-azimuth which means that it is basically “point and shoot”. It is quite sturdy and has a nice black finish.
Overall, the StarSense line is always an excellent choice for beginners. Its main feature is how easy it is to use and the novelty and helpfulness of the guided app.
Note that you will need an internet connection for the app to work, so take that into account if you are planning to go to truly remote places with no cell coverage.
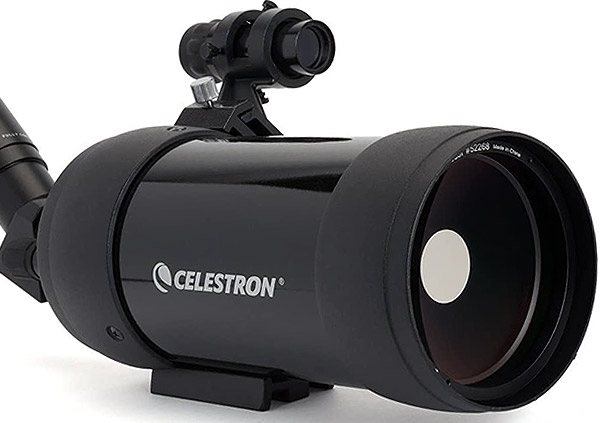
Best for hiking/backpacking: Celestron C90 MAK
| Manufacturer | Celestron |
| Model | C90 MAK |
| Type | Maksutov-Cassegrain |
| Aperture | 90mm (3.5″) |
| Focal length | 1260mm |
| Weight | 4.6 lbs (2.1kg) tube only |
| Limiting magnitude | 13.5 |
| Max useful magnification | 180x |
| Accessories | 32mm Plossl eyepiece |
| Price |
Every single pound matters a lot when it comes to hiking so our main concern for this category is going to be weight.
While there are many smaller options like binoculars or handheld spotting scopes, nothing replaces the optical power a true telescope can get you.
A hiking or backpacking telescope should also work in daylight to be able to look at nature, landscapes, animal watching, etc. Important: DO NOT point it at the Sun during the day. You will hurt your eyes unless you use a solar filter and even then that’s better left only for solar eclipses and more experienced stargazers.
Photography is a big use case for a hiking telescope so our pick should also allow for terrestrial and at least basic astrophotography.
With all those necessary features in mind, we have selected the Celestron C90 MAK as our pick for the best hiking telescope. It is a small version of a Maksutov-Cassegrain design. This kind of telescope folds the light inside the tube so it bounces multiple times, allowing them to have the aperture and focal length of a larger telescope in a compact tube.
The C90 MAK weighs around 4.6 pounds (tube only). It does not include a tripod, but that’s ok because my recommendation would be to replace it anyway because a traditional mount can triple the weight of the telescope’s tube.
Instead, my recommendation is going to be to use a camera tabletop tripod. The C90 MAK uses a standard 1/4″ 20 screw that works with most regular tripods. If you are into nature photography, you might already have one of these tripods which means you wouldn’t even need to purchase or carry extra equipment
If you don’t have one check out the Neewer 20″ that supports up to 11 lbs (5kg) which should be enough for the scope connected to a DSLR camera. If you don’t plan to use it with a camera, you have even cheaper options like this Reticam tripod.
With a tabletop tripod, you would be adding less than 2 pounds. They also take very little space
But the C90 MAK is not just powerful enough for a trip. One of the reasons I chose it is because it’s still a decent backyard telescope. If you don’t have any other telescope at home, stick a regular mount to it, and voila!. It’s good for some basic astronomy like looking at the Moon, Jupiter, Saturn, and under good sky conditions, you might even get a good view of the brighter deep space objects.
One small disadvantage is that it only comes with one eyepiece. It’s a high-quality low-magnification 32mm Plossl, which performs excellent for terrestrial viewing, but for astronomy purposes, you will definitely want to grab a couple more. An 18mm and a 9mm should give you a good range of options. Check out the Omni line, they are affordable and will go great with it. The highest useful eyepieces you can use with it are in the 6mm-8mm range.
The C90 Mak comes with its own backpack but you can use your own as long as it has some padding.
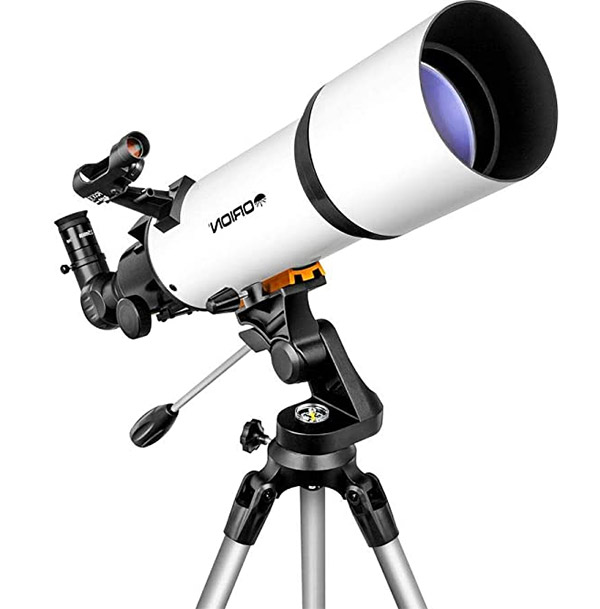
Best for stargazing: Orion Starblast 102mm
| Manufacturer | Orion |
| Model | Starblast 102 |
| Type | Refractor |
| Aperture | 102mm (4″) |
| Focal length | 600mm |
| Weight | 10.6 lb (4.8 kg) |
| Limiting magnitude | 12.7 |
| Max useful magnification | 200x |
| Accessories | 25mm, 10mm Plossl eyepieces |
| Price |
My main consideration for picking a travel telescope for stargazing is “what telescope is going to give you the most power while still being small enough to be considered portable?”.
My first instinct was to pick a 120mm Sky-watcher that offers excellent views, but while thinking about it I realized it was a bit too hard to set up and use, and when I’m on the field I prefer to spend as little time as possible tinkering with the telescope and spend more actually looking at the stars. I just wanted something that was “point-and-shoot”. Enter the Orion Starblast 102mm.
This is one of the easiest to use telescopes I have tested. It’s truly the definition of “grab and go”. The included AZ mount is very intuitive to use and gives you X and Y-axis movement. It is good enough for learning how to track planets and other objects.
The short focal length (600m) results in a wider field of view that works great for looking at nebulas, galaxies, and deep space objects in general.
For planetary viewing, it performs well enough. It’s still a relatively small refractor so the level of detail you can expect is limited by its aperture, but the fact that you will be mostly using it in places with low light pollution helps a lot to get good views out of Mars, Jupiter, and Saturn.
The included eyepieces are Plossls which is great and it means you won’t feel the need to upgrade them anytime soon. The only missing accessory that I’d add as soon as possible to get more magnification options is a 2x Barlow lens (here are our Barlow lens recommendations).
It also comes with a 90 degree diagonal that fixes the upside-down view that confuses some beginners and is definitely not optimal if you plan to also use it for terrestrial viewing. Do note that the image will still be flipped left-right. That’s normal, but it’s something that might confuse you when using it for terrestrial viewing.
I think the Orion Starblast is a great travel telescope that offers some decent power without taking too much space. If you still think it is too big or too heavy, there are 90mm and 70mm versions of it.
Now, if you do want more power and don’t mind the extra work and weight, here’s the link to the Sky-watcher 120mm I was talking about above.
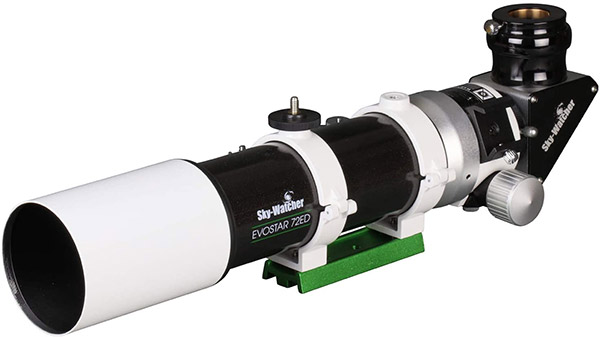
Best for astrophotography: Sky-Watcher EvoStar 72 APO
| Manufacturer | Sky-Watcher |
| Model | Evostar 72 APO |
| Type | APO Refractor |
| Aperture | 72mm (2.8″) |
| Focal length | 420mm |
| Focal ratio | f/5.8 |
| Weight | 4.3 lb (1.95 kg) tube only |
| Limiting magnitude | 13 |
| Max useful magnification | 144x |
| Accessories | None |
| Price |
There are some additional requirements to take into account when it comes to choosing a telescope for astrophotography besides portability.
First, the telescope needs to be fast. In optics, a fast device means it has a low focal ratio. This is beneficial because it means the light is gathered quickly and that results in less exposure which is necessary to obtain a good image. A good focal ratio for astrophotography is below f/6.
The focal ratio can be calculated by dividing the telescope’s focal length by its aperture, but you don’t need to worry too much about doing the math as it will usually be listed in the specifications.
Traditional refractor telescopes use achromatic lenses. but the ones that are built for astrophotography, use apochromatic and extra-low dispersion lenses. Explaining the difference between an achromatic and an apochromatic lens would require its own article, but all you need to know is it corrects the color and spherical errors that chromatic lenses can present sometimes.
Manufacturing these apochromatic lenses is expensive, so expect to pay significantly more for them.
I chose the Sky-Watcher Evostar 72 as the optimal travel astrophotography telescope for a few reasons:
- Excellent optics
- Reasonable price compared to similar instruments
- It’s actually available at the time of writing this unlike many other options that have been out of stock since 2020.
Below are a couple of examples of the king of images you can expect to get from the Evostar 72 with some practice.
As you can see. This thing is really powerful and can get some beautiful shots.
The one downside to the Evostar is that it comes with no accessories. Not even a diagonal or an eyepiece. You will need to supply all of that if you want to do visual work and you’ll also probably want to also get a focal reducer, a field flattener, a 2″ to 1.25″ adapter, and of course, a solid mount that can support all that weight. If this is your first astrophotography telescope and you don’t have those accessories already available, you can run up quite the tab.
The one thing that is included is its own padded hard case which is solid and not too bulky.
Do note that when it comes to astrophotography, “travel size” is always relative. Be prepared to travel with plenty of bags and cases full of cables, adapters, and other equipment. The weight and size of the tube aren’t going to matter as much because you will already need to be prepared to bring a lot of things. Here’s a nice guide on how to travel with astrophotography equipment which is a great read to know what you need to prepare for, especially if you plan to fly.
Doing astrophotography in the field can seem intimidating, but it’s definitely worth it and the Skywatcher Evostar 72 is a solid piece of equipment to get started with it.
Best budget pick: Celestron 70mm TravelScope
| Manufacturer | Celestron |
| Model | TravelScope |
| Type | Refractor |
| Aperture | 70mm (2.75″) |
| Focal length | 400mm |
| Focal ratio | f/5 |
| Weight | 4.2 lb (1.9 kg) |
| Limiting magnitude | 11.7 |
| Max useful magnification | 165x |
| Accessories | 20mm, 10mm Kellner eyepieces, 2x Barlow lens, smartphone adapter |
| Price |
If you are on a tighter budget, there are still some reasonable options.
The Celestron TravelScope is a small scope that can fit into an (included) backpack even with its retractable tripod. It’s a good fit for both camping and hiking.
The optics are reasonable for what it is but don’t expect spectacular images out of it. It’s really a basic, entry-level telescope for either first-time users or kids/teens.
It will allow you to get good shots of the Moon, find Mars, Jupiter, and Saturn with a small amount of detail. Neptune and Uranus might be visible under clear skies, but you’ll only see them as colored dots.
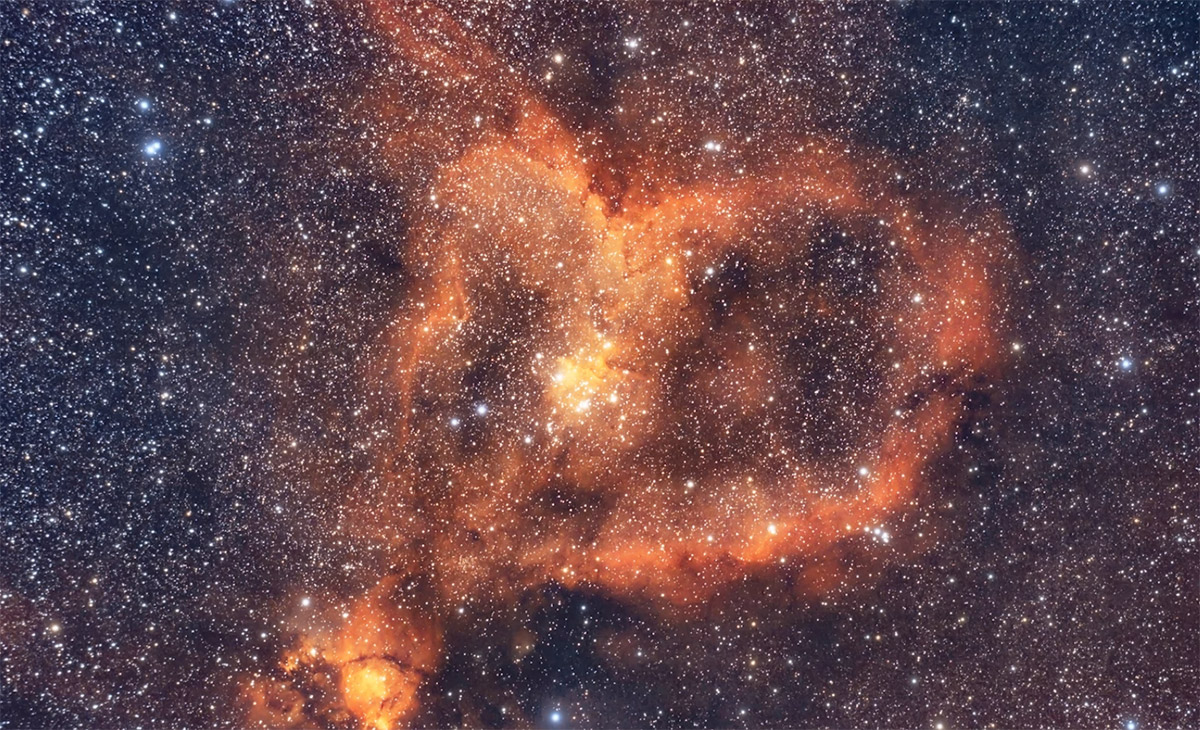
Some of the brighter deep space objects like the crab nebula or the whirlpool galaxy will be visible with a small level of detail.
This is mostly a fun, learning telescope to get into the hobby, and as long as you see it like that and don’t expect high-quality images you will get a lot out of it.
It also works as a secondary telescopy if you have a more powerful device that is not fit for travel.
The price of the 80mm TravelScope is hard to beat for the quality of its optics and because it comes bundled with all the accessories you need to get started, including a smartphone adapter you can use to take pictures with it.
The included eyepieces are serviceable but can be upgraded to Plossl if you want to squeeze a bit more performance.
There’s a 70mm and even a 50mm version of the TravelScope, but those have very limited optics and the difference in price is not that much.
Enjoyed this article?
Get daily 10-minute PDFs about astronomy to read before bed!
Sign up for our upcoming micro-learning service where you will learn something new about space and beyond every day while winding down.


 review")