
Choosing a telescope for the first time can become an exhausting and overwhelming task. These devices are advertised with numbers and words that hold absolutely no meaning if you are not familiar with the hobby already.
What is a “refracting telescope”? why are 150mm telescopes more expensive than 70mm ones? and why is it sometimes the other way around? what does alt-azimuth mean? it sounds like a made-up word!
As someone who has been stargazing with telescopes for 15 years and has been writing about astronomy professionally for the past five, it is my goal with this post to help you learn everything that you need to know about telescope specifications in this simple and easy-to-understand article that does not require any prior knowledge. By the end of it, you will know everything you need to make an informed decision and pick the model that better suits your needs.
Let’s get started.
Magnification
When you think of what specification could be important for a telescope, the first thing you might think about is magnification.
The magnification of a telescope depends on two factors. First, the aperture of the telescope which we’ll talk about below, and second, the eyepiece that you are using with it.
An eyepiece is the part of the telescope where your eyes go. Think of them as the exit point of the device. Eyepieces are replaceable and come in different sizes that go from 3.5 millimeters to 50 millimeters. The lower the value, the higher the resulting magnification. For example, a 4mm eyepiece is considered “high powered” because it results in high magnification while a 35mm one is considered “low powered”.
When it comes to magnification, more isn’t always necessarily better, which might seem counter-intuitive. There are use cases for different levels of magnification. In general, for close objects like the planets of the Solar system or the Moon, a high magnification is better as it allows you to get more detail out of them. For very far-away objects (deep-space objects) like galaxies, low magnification works better because it allows you to track them better and observe them as a whole. These are so far away that you will not get a lot of detail out of them anyway.
Every telescope has the maximum magnification it can reach. This is sometimes called “highest useful magnification”. It doesn’t matter if you use eyepieces that would result in a higher magnification. Once you pass that point, you will not get any more detail or magnification out of the image and sometimes you will even get blurry results.
The highest useful magnification can be easily calculated with a calculator like this one, however, it is not a number that you need to worry much about at the beginning. It is also not a number that you will see advertised much by the manufacturers. Since the maximum magnification is mostly determined by the aperture, as long as you focus on getting a larger aperture, the maximum magnification will automatically increase as well.
Aperture
As a beginner, you will hear a lot of people say that the aperture is the most important, or even the only significant number of a telescope. And while there are exceptions to the rule, this is mostly true.
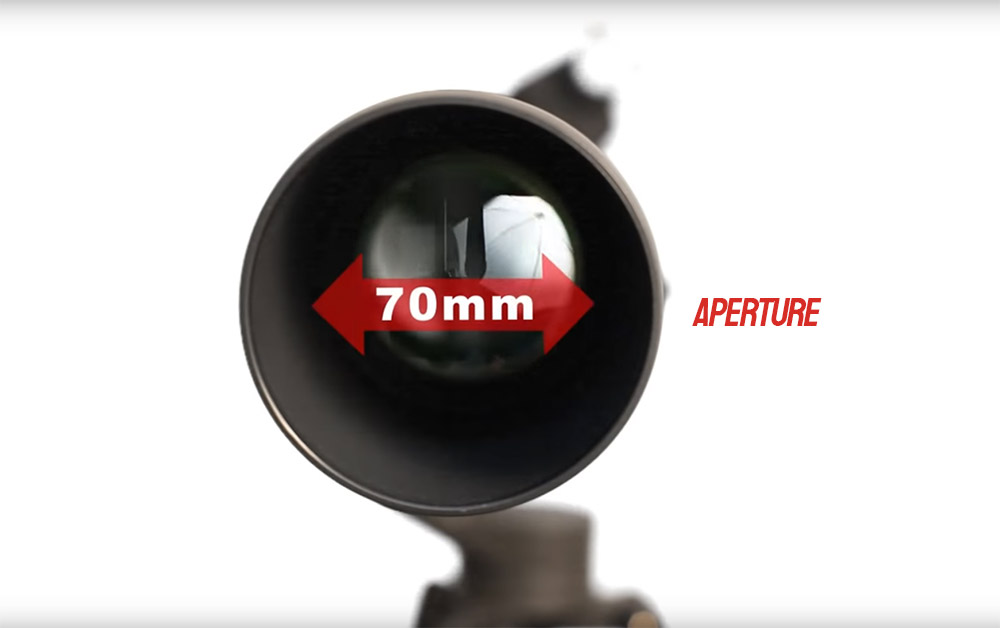
The aperture of a telescope is the size of the primary lens or mirror. The larger the lens, the more light it can capture which results in higher quality images and the possibility to capture objects that are farther away.
Whenever you see a telescope advertised, the aperture is always the first number that you will see next to the name. Take, for example, the Celestron StarSense LT 80AZ, the 80 means that it has an aperture of 80mm (3.15″).
In the old days, when people tried to advise newcomers, the rule of thumb was always. Get the highest aperture that your budget allows for. While this is still mostly true, I think that there are cases today where the aperture is slightly less important than other features. For example, the Celestron Starsense telescope I linked above comes with a star mapping feature included which makes it amazing for beginners but also makes them pricier than a comparable model in terms of aperture. I’d argue that in that case, you could prioritize that feature instead of the aperture.
Another exception to the rule happens when you account for portability. Telescopes with large apertures are also heavier, clunkier, and require storage space. If you are looking for a telescope that you can bring to a camping trip then aperture also takes a backseat.
Besides those considerations, maximizing the aperture that your budget allows for will always get you the best results. A 130mm telescope made by an unknown Chinese brand with a funny name is going to resolve better images than the most expensive 70mm telescope on the market (except maybe for the ultra high-end astrophotography telescopes). It is just physics. The more light enters the telescope, the more information the image will have.
The minimum aperture that I would recommend for a beginner telescope is 70mm. Anything below that is just going to be too low-powered for stargazing (although for nature-watching they are fine). We have a few articles with photos showing what you can expect out of a telescope at different apertures (70mm, 100mm, 130mm) so you can get an idea of what you will see through the eyepiece.
That’s pretty much everything you need to know about aperture, but if you want to go deeper into the subject, we have a whole guide on aperture that goes into extra detail and an aperture comparison gallery with photos.
Focal length
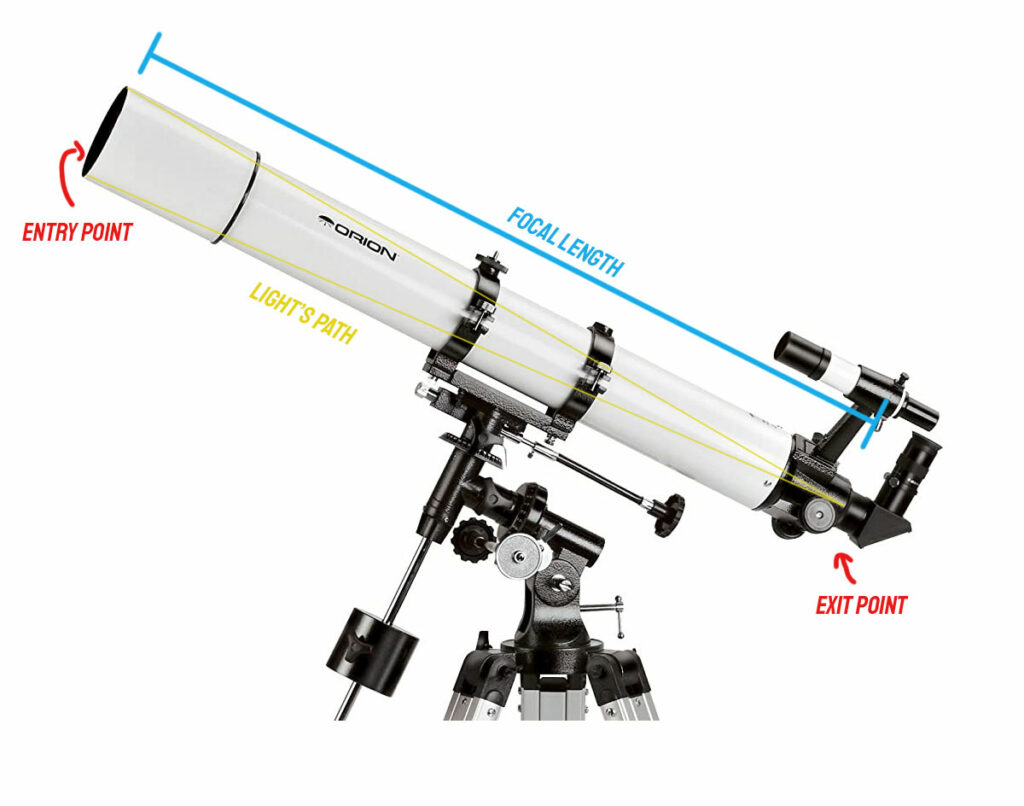
The focal length of a telescope is the distance that light has to travel from the primary lens (or mirror) to the exit point. This is a fixed number that every telescope has and does not account for the focal length of the eyepiece or any other accessory.
In the most basic telescope designs, the focal length is going to be equal to the length of the tube. This is because light enters through the front, travels across the tube, and exits on the other end. It is pretty straightforward. However, some designs are a bit more complex. In these, the light is bounced and folded multiple times inside the tube. The focal length in these telescopes can be considerably longer than what the length of the tube suggests.
In general, focal length does not affect the quality of the image directly. Its main effect is to increase or decrease the field of view. The field of view is the size of the area in the sky that you can see through the telescope.
A large field of view will allow you to capture many objects at once and get a more “panoramic view of the sky”. This is great for looking at galaxies or deep-space objects.
On the other hand, a small field of view is better for planetary viewing since it allows you to focus on a single object at once.
The focal length works opposite to the field of view. A short focal length results in a large field of view, and a long focal length equals a small FoV.
The focal length can also be artificially increased or decreased using accessories such as Barlow lenses or focal extenders.
Finally, the last effect of the focal length is brightness. A very long focal length can mean a loss in brightness because some light is lost during the transmission. This effect is minimal in telescopes that are well-manufactured and is generally not a big concern.
There is no good or bad number for focal length. A short focal length is preferred for some use cases like astrophotography and a long focal length is favorable for general use.
We also have a more complete guide to focal length if you want to check it out.
Focal ratio
The focal ratio of a telescope is the result of dividing the focal length by the aperture. Usually, you will see it written as “f/x” with no units.
For example, to get the focal ratio of a telescope that has a focal length of 1000mm and an aperture of 90mm you would divide 1000mm/90mm which is 11.1. So, you would say that the telescope has a focal ratio of f/11.1
Since the focal ratio is determined by the two specs that we have already explained above, there is not much to say about it.
Focal ratio is mostly used in the context of astrophotography. For this use case it is important because just like in regular photography, a short focal ratio implies short light transmission, which helps resolve better images.
A telescope with a low or short focal ratio (between 3 and 6) is said to be a “fast” telescope. One with a long focal ratio (8 and above) is called a “slow” telescope. But again, these terms are mostly used in astrophotography. If you don’t plan to get into that don’t worry too much about it.
Eyepiece barrel
Eyepieces connect to the telescope through a barrel slot. This slot has two possible standard sizes. 1.25″ and 2″ inches”. Why is this listed in inches when all the other specifications are in millimeters? I have no idea.
These standard sizes mean that you can pair any telescope with any eyepiece without worrying about brands or compatibility. They all fit. This makes buying high-end eyepieces a good investment as they can outlast your telescope.
Most amateur and enthusiast-grade telescopes use a 1.25″ slot, and 90% of the eyepieces sold on the market come in that size. 1.25″ eyepieces come in all kinds of focal length sizes.
2″ eyepieces provide a wider field of view and brighter images. As a result, they are more useful for deep-space observing. Manufacturers don’t even make 2″ high-magnification eyepieces because they don’t make much sense in terms of usefulness.
Telescopes that come with a 2″ slot also support 1.25″ eyepieces and they generally come with an adapter to fit them and you will not see a difference in quality as it is simply a smaller barrel with no optical elements.
There are also 1.25″ to 2″ adapters although the only reason to use them is if you have two telescopes and you want to share one specific eyepiece.
Telescope Type
When you hear that a telescope is a refractor or a Newtonian or a Dobsonian, that refers to the type of telescope or its inner design.
Telescope types can be a bit complicated as they each have their pros and cons. We have a guide explaining all the major types and another one just for reflecting telescopes. Go check those out if you want the detailed explanations, but here’s a quick rundown.
- Refracting telescopes (refractors) – This is the design that you of of when you think of a telescope. Long, thin tubes that have a lens on the front. These are recommended for kids and beginners due to their ease of use and maintenance. They are generally limited in terms of power.
- Reflecting telescopes (reflectors) – Bigger telescopes that use mirrors and capture the light at the bottom of the tube instead of the front. Recommended for adults as they require a bit of maintenance. Reflectors can be built in large sizes. The telescopes used in large observatories are reflectors. Newtonians and Dobsonians are types of reflecting telescopes.
- Compound telescopes – Hybrid designs. Also called “Cassegrain” telescopes. They use a mix of features of both refracting and reflecting models. They are generally on the expensive side of things, but their optical quality is the best.
Mount
There are two main types of telescope mounts. Alt-Azimuth and Equatorial. These are often shortened to AZ and EQ respectively.
Again, we have an in-depth article about mount types explaining their differences in detail. But here are the basics that you need to know.
- Alt-Aimuth. Easy to use, basically “point and shoot”. The tradeoff is precision and the inability to track objects easily. Recommended for beginners.
- Equatorial. These mounts rotate over the same “plane” as the stars in the sky, so they can track movement precisely. Great for astrophotography. They have a learning curve and are slightly more expensive. Equatorials can also find an object using its coordinates. Recommended for enthusiasts or beginners who don’t mind a harder first experience.
Most home telescopes come bundled with the type of mount that makes the most sense for the model so generally, you don’t need to worry about choosing.
Enjoyed this article?
Get daily 10-minute PDFs about astronomy to read before bed!
Sign up for our upcoming micro-learning service where you will learn something new about space and beyond every day while winding down.


")
