")
Looking up at the night sky is one of life’s simplest pleasures, and owning a telescope can take this experience to a whole new level. Did you know that approximately 15% of American households own a telescope? That’s a lot of stargazers! And it’s no wonder why; the universe is a vast and wondrous place, and exploring it through the lens of a telescope can be both relaxing and awe-inspiring.
However, choosing a telescope for beginners can be overwhelming. With so many types, sizes, and features to consider, it’s easy to feel lost. But fear not! In this post, we’ll provide you with easy-to-understand tips on how to choose the perfect telescope for your needs.
Not only is stargazing a fun and educational hobby, but it also has numerous positive effects on your well-being. Studies show that stargazing can reduce stress, increase mindfulness, and inspire curiosity and wonder. So, let’s get started on your journey to the stars!
In this guide, we will not be looking at specific telescope models or recommendations. We’ll leave that for one of our many buying guides that are tailored for specific uses.
The quick version
If you don’t want to read the whole explanation, here are some quick tips that will help you narrow your search. Just select the ones that apply to you:
- The minimum recommended aperture for a basic telescope is 70mm. Anything below that is not going to be a good experience.
- Pick a telescope type that fits your needs, and then get the highest aperture your budget allows for. The only exception is travel telescopes where weight and size are the priority.
- For kids, a 70mm-90mm refractor is recommended if they are going to use it by themselves. Here are some specific recommendations for children 10 and under and for teenagers.
- Adults have a wider set of options. If you want ease of use, pick a refractor, if you don’t mind a bit of a learning curve that will reward your efforts later on, go with a Newtonian. If you want maximum power, pick a Dobsonian. Here are some specific recommendations for adults. I’d recommend an aperture of 102mm-150mm unless you want something ultra-portable.
- Don’t invest heavily into a bunch of accessories (eyepieces) at the start. Learn with the included ones and maybe just get a Barlow lens if your telescope doesn’t include one.
Parts of a telescope
The following picture shows the main parts of the telescope. I will not go into much detail about each of them, but I just want to give you a general idea of what they are and which of them matter when choosing a device.

In some types of telescopes, the eyepiece can be found in the upper third of the tube.
Primary lens – This is the heart and most important piece of a telescope. It is the optical instrument that is going to capture the light coming out of the stars and planets. The bigger this is, the more light it can capture and the better detail you can get. Some telescope types use mirrors instead of lenses, but the general idea is the same.
Tube – This is where the light is transmitted to the exit pupil where you will see it.
Mount – Connects the body of the telescope to the tripod. It is used to rotate and point the telescope.
Red dot finder – It is a pointing tool used to a small red dot onto the night sky so you can keep track of objects.
Eyepiece – This is where your eyes go and where you’ll be able to look at the images the telescope resolves. The eyepiece is the part that magnifies the image. They are interchangeable so you can try multiple magnifications. Most telescopes come with two or three included but you can purchase more separately. There are only two standard sizes, 1.25″ and 2″. The large majority of home telescopes use 1.25″ or come with an adapter for it so pretty much every eyepiece of any brand can be used interchangeably.
What do the telescope’s specifications mean?
To pick a good telescope, the first thing you need to understand is what all the technical specifications mean. Thankfully, there are only a couple of really important terms that really matter for a first-time user. The rest you can forget about for now and learn about them along the way once you have more experience.
Aperture
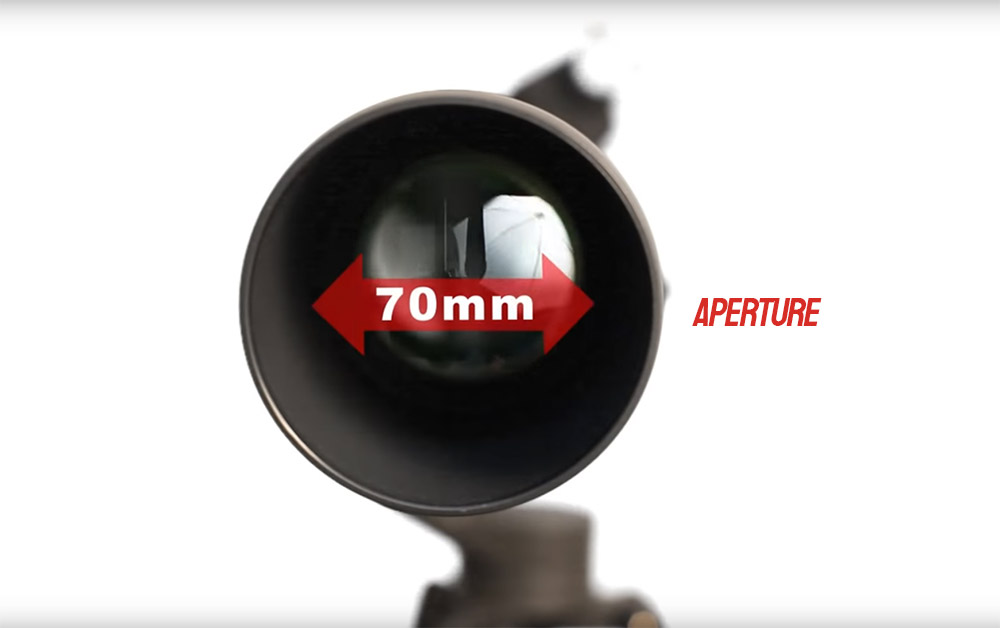
The aperture is the most important specification that you must consider. Depending on your needs, it might even be the only number that matters at all when it comes to choosing the right telescope for you.
Essentially, the aperture is the size of the telescope’s main lens. The bigger the lens, the more light the telescope can capture. As a result, the image will have more detail, sharpness, better contrast, and more colors.
The aperture is usually given in millimeters. It is not hard to make the conversion to freedom units because 1 inch = 25 mm approximately.
When comparing two similar telescopes, you will usually see that the larger the aperture, the higher the price too. However, the confusing part comes when you see telescopes with a small aperture that are priced at several hundreds of dollars and then others with huge apertures that are reasonably priced. What’s going on there?
Well, the thing is, not all telescopes use the same type of optical instruments. Some telescopes use lenses, while others use mirrors. Other telescopes, even when they are smaller, use complex designs with multiple lenses inside the tube to resolve higher-quality images. So even if the main lens is relatively small, the extra cost comes from all the other lenses you don’t see from outside.
We’ll get into all of this in more detail below when we get to the different types of telescopes, but what you need to know now is that given two telescopes of the same type and same brand, the one with the larger aperture is going to produce better images.
Telescope type
When you are getting started, you will hear about many telescope types: Newtonians, Schmidt-Cassegrain, Dobsonians, etc. Looking into each of them would be a giant task. Thankfully, you don’t have to.
Here’s what you really need to know.
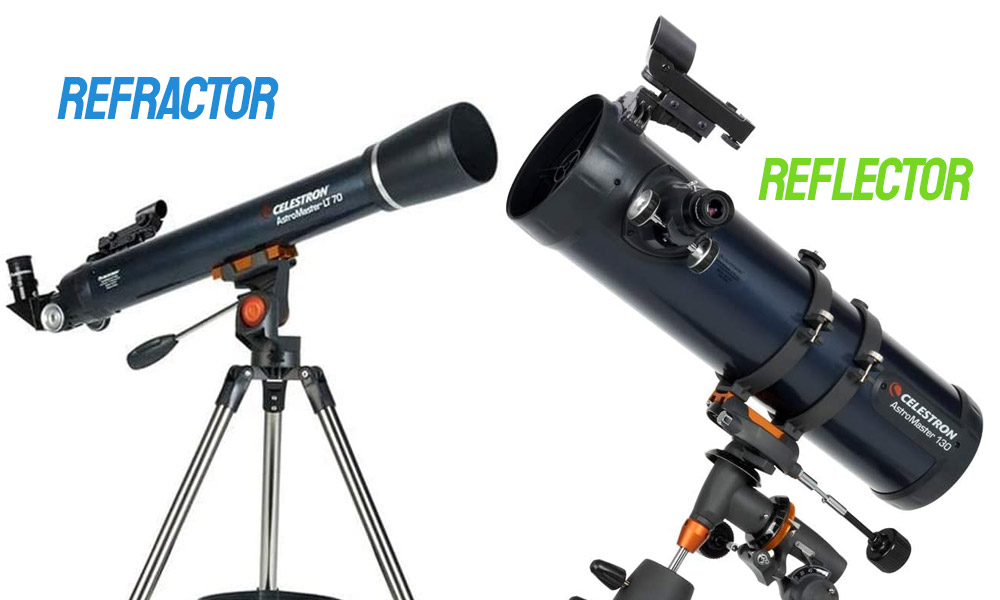
There are two main types of telescopes. Reflecting and refracting telescopes. They are called that because the former uses mirrors to reflect the light, and the latter uses lenses to refract it into a single point. Everything else is just a subtype or a hybrid of these two.
There are pros and cons to each of them and we have in-depth articles covering them (reflecting telescopes | refracting telescopes) but here’s the short version:
- Refracting telescopes use lenses, and reflecting telescopes use mirrors. Because of this, refractors are more expensive to produce in large sizes. Above 130mm of aperture, you will only find reflectors on the market.
- Refracting telescopes don´t require any maintenance. Reflecting telescopes do. The mirrors need to be realigned every few months and some need to be cleaned occasionally because they collect dust.
- Refracting telescopes resolve sharp, high-contrast images but tend to show chromatic (color) and spherical errors. Reflectors don’t show errors but show slightly dimmer images.
There is no “better” telescope type. It all depends on what your specific needs are. But here are some suggestions that might help you make your decision. If one of these use cases sounds like you, this is a good place to begin your search.
- For kids, refractors are generally recommended because they don’t need maintenance and are generally durable and light.
- Adult beginners can take their pick between any type depending on budget and ease of use.
- Reflecting telescopes with an EQ mount (more on mounts below) are recommended for people who want a long-term device that will grow with them. Refractors tend to be “outgrown” faster.
- For travel and camping, small refractors are optimal.
- For people looking to maximize power (magnification), reflectors are the best choice.
The most common types of reflector telescopes are Newtonian and Dobsonian. You will sometimes even hear “Newtonian” as a replacement for “reflector.
Both are good, the main difference is Newtonians sit on a tripod, have more precise movement, and are still relatively portable. Dobsonians are big buckets that are made to get the maximum amount of magnification for the least price, but they sacrifice precision, are clunky, and require more storage space.
Magnification
If you don’t know anything about telescopes, your first thought might be to search for something like “What is the best magnification?”. Thankfully, you arrived here so I can explain to you that that is not the best way to go about it.
The magnification is the number of times that the image you see will be increased so your eye can see a bigger picture. It is basically the same as the zoom in your camera, but you are zooming in tens or hundreds of times instead of 2x.
The formula for magnification is simply the result of diving the telescope’s focal length by the eyepiece’s focal length. Since eyepieces are interchangeable, that means that you can change the magnification at will and it is not going to be entirely dependent on your telescope. As a result, I wouldn’t consider magnification to be a top priority when it comes to choosing a telescope model.
The only consideration about magnification that you should worry about is the “highest useful magnification”. That is the maximum limit of magnification that your telescope can reach. If you use a high-powered eyepiece that results in a magnification bigger than that number, you will no longer get any benefits from it and you might even start to see blurriness and image artifacts.
The highest useful magnification is calculated using the aperture of the telescope. You can use this calculator to get it. The higher the aperture, the higher the maximum useful magnification. Because of that, the only number you should worry about then is the aperture because by getting a large aperture, you are already taking care of the magnification too.
Focal length
The focal length is the distance that light travels between the telescope’s main mirror and the exit pupil. It is given in millimeters and goes from 400 mm to 1500 mm for most home telescopes.
Focal length isn’t a key factor to consider when choosing a telescope because it can be artificially increased or decreased by using certain accessories. However, you should at least know what it does and how it affects the views that you will get.
It is going to determine two things.
- How “fast” a telescope is (long focal length = “slow” telescope)
- The field of view.
How fast a telescope is only relevant for advanced astrophotography telescopes where short focal lengths are favored. It is not going to make a big difference for an amateur telescope.
The field of view is how big is the “area” of the sky that the telescope can see. It does not affect the quality of the image, but depending on the type of celestial object that you want to look at, certain focal lengths can be optimal. As a general rule, planets look better with long focal lengths (narrow fields of view), and deep space objects like nebulae and galaxies can be better appreciated with a short focal length because the wider field of view allows you to fully capture them.
Other specifications
The remaining specifications are not relevant to what you will see so I’m going to skip them so you don’t get too overwhelmed with information. There are also some that are pretty obvious like weight. If you plan to take your telescope to the field, then you will probably want to give preference to models that are light and compact.
As for focal ratio, you might run into it, but because it is derived from the focal length and the aperture, I find it redundant. Just know that just like with focal length, a low focal ratio (f/7 and below) performs slightly better for wider objects like galaxies and a big focal ratio (f/10 and above) does the same for single objects like planets or the Moon. But again, since it is something that can be modified and optimized with accessories, it’s not something you should worry about too much.
Brands
Just like with any other product, the brand of a telescope plays a big role in the quality and performance you can expect from it.
The most important part of any telescope is its optical instruments. A lens that has been badly manufactured will result in visual issues like chromatic aberrations, ghosts, blurriness, or dim images. This is why going with a trustable brand is recommended.
The following is a list of brands that make telescopes that I have personally tested. I have divided them into three categories depending on their price.
All of these are usually good options compared to equivalent competitors.
Budget brands
- SVBONY
- Solomark
Consumer brands
- Celestron
- Orion
- Meade Instruments
High-end brands
- Tele Vue
- Williams Optics
- SkyWatcher
Mounts
The mount is the device that connects the tripod to the body of the telescope. It also has all the controls you will be using for pointing the telescope to your targets.
There are two main types of mounts. Alt-Azimuth and Equatorial mounts. They are usually abbreviated as AZ and EQ respectively.
AZ mounts are friendly and easy to use. They are basically “point-and-shoot”. The mechanism is a simple lever or two that move the telescope up-down and left-right. Most refractors on the market come with an AZ mount because they are targeted at kids or people who prefer ease of use.
The disadvantage of AZ mounts is that they are not precise and are not good at tracking moving objects.
EQ mounts, on the other hand, have a steeper learning curve, but they have excellent precision and are better for tracking. These are recommended for people that like going more in-depth with their hobbies. EQs are generally included with Newtonian telescopes.
There are also computerized mounts that do all the pointing and tracking automatically using an online or a built-in database. However, those only come with high-end telescopes that I wouldn’t recommend to someone starting out as they are too big of an initial investment (unless you have lots of cash to spare in which case, go for it).
Mounts can be replaced and upgraded. They are also sold separately. However, it is generally not worth it because they are too expensive by themselves. Most of the time it is better value to just get a new telescope that is bundled with the mount you want and sell the old one.
Accessories
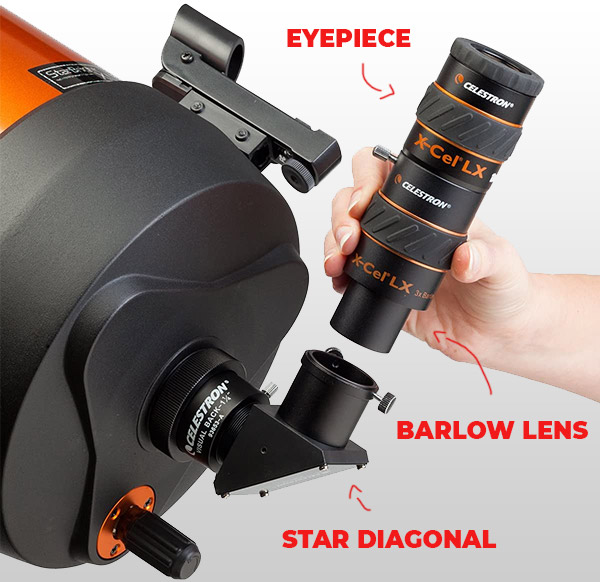
All telescopes come with everything you need to get started right away. They usually come with two or three eyepieces, one red dot finder, and in some cases, they include a Barlow lens and/or a smartphone adapter.
You don’t have to purchase any additional accessories but if your telescope does not include a Barlow lens, I’d recommend you to get one.
Think of a Barlow lens as an extension for your eyepieces. It is going to multiply the magnification of the eyepiece by a certain number. The most common Barlows are 1.5x, 2x, and 3x.
If an eyepiece is 25mm, adding a 2x Barlow is going to double the magnification and it will now act like a 12.5mm (in eyepieces, a lower number = more magnification).
This means that if your telescope came bundled with two eyepieces, by adding a Barlow you will now be able to use four different magnifications.
Barlows are a cheap and efficient way to test more magnification without having to build an expensive eyepiece collection. Here are some Barlow lens recommendations. Pick one that matches the budget level of your telescope, there’s no need to overspend on it either.
Astrophotography
I’ll be a bit blunt. If this is your first telescope, you shouldn’t get a fancy (and expensive) astrophotography telescope. I’ve seen too many people overspend too much money into professional-level gear because they were certain they wanted to get into it only to use the equipment twice, realize it is not what they expected and sell everything months later for half the money they paid. This is great for people like me who get to buy said gear for cheap, but I’d encourage you to not make the same mistake.
Get a more reasonable stargazing telescope, learn with it, and once you know you want to take the next step, then you can upgrade.
Astrophotography is a very different beast than regular stargazing. It requires a certain skill set and know-how that takes a long time to build.
If you want to take photos with your telescope, get a smartphone adapter, or if you want to test something a bit more serious, pretty much any decent Newtonian can support the weight of a DSLR and there are adapters for it.
How to choose your first telescope
To conclude, and considering everything we have learned above, here’s a list of the steps I’d personally take when choosing a telescope as a first-time user.
- Consider who is going to be the main user and how they’ll be using it. A kid? or an adult?
- If the main use case is going to be on the field, then consider a portable telescope, here are some recommendations.
- For children, a 70mm to 90mm refracting telescope is recommended. Here are some options.
- Adults can choose between reflectors and refractors. The main consideration is if they want to favor power or ease of use. Here are some reflector recommendations. We are working on our refractors guide but my first choice would be something like the Celestron Starsense Explorer 80LT.
- After you have decided which type of telescope is best suited for you, invest your budget into maximizing the aperture over other specs.
- High-end telescopes are going to get you sharper, brighter images, but only more aperture is going to get you more detail, so focus your budget on that.
- Check out the photos in these articles about what to expect out of a 70mm telescope vs 130mm telescope so you can get an idea of the difference between apertures.
- Don’t spend too much on accessories. Test the ones bundled with your telescope first and then add them as you learn more about what you really need.
Conclusion
I know this guide was a bit long so thanks for sticking with it and reaching the end. This should cover everything you need to know to make an informed decision but there’s a lot more that you’ll learn along the way.
Astronomy is a wonderful and extremely rewarding hobby. You won’t regret getting your first telescope. If you are ready to look at specific models, check out our many telescope buying guides for one that fits your use case.
Enjoyed this article?
Get daily 10-minute PDFs about astronomy to read before bed!
Sign up for our upcoming micro-learning service where you will learn something new about space and beyond every day while winding down.


")
