
Telescopes seem fairly easy to use, right? you simply point it at the sky, look through the eyepiece, maybe adjust the focuser a little bit, and sit back and enjoy the stars. And truth be told, they are relatively easy to use.
There is a small problem, though. And if you are a newcomer to the hobby, you might not even think about it until after you have purchased, unpacked, and set up your telescope for the first time. The sky is BIG. Where the heck do you point it to? If you want to look at a particular planet or galaxy, you need to find where they are first, and that part can be tricky.
There are multiple methods to do this. Traditionally, hobbyist stargazers would have to learn to star-hop. That means, using the brighter stars in the sky as a reference to triangulate the position of other objects. While star-hopping can be fun, it does take a lot of memorization, trial, and error. It does take time which means that you could sometimes spend more time trying to find the things you want to observe instead of actually observing them.
Some other people preferred to use star maps. These were literally maps of the sky that would tell you where everything is. The problem is, the sky looks different every night and at different times. So star maps had to be huge or complicated to use.
Now in the digital era, things are much easier. Star maps are integrated into our phones and can detect your position using GPS and that makes things much easier, but you still need to do some adjusting.
Some computerized telescopes can connect to an online database, map out the sky, and automatically point the telescope to the exact location accounting for your precise location. Unfortunately, those are generally on the expensive side and can be a steep investment for someone just trying to get into the hobby.
Enter the StarSense technology.
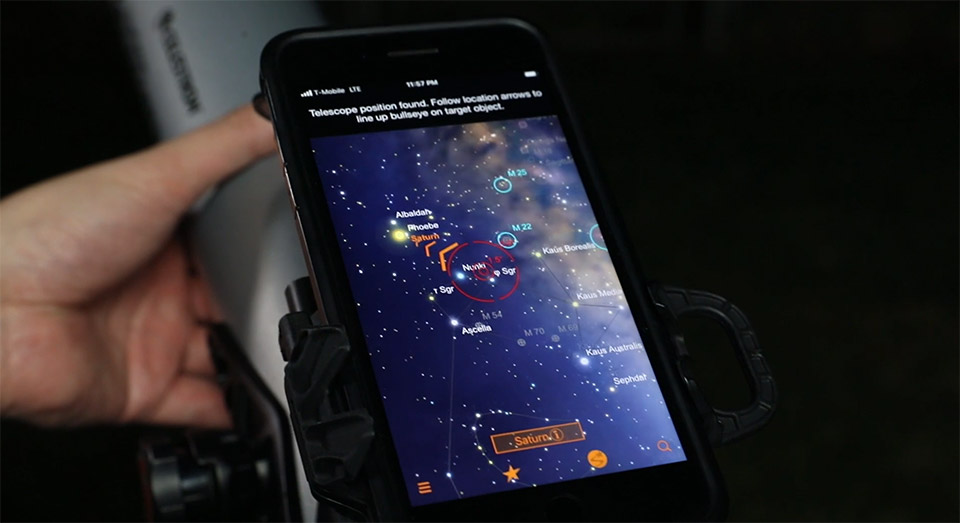
The StarSense series by Celestron tries to solve this problem by creating a bridge between a “dumb” telescope and a computerized one. It works by attaching your smartphone to the telescope. Then you fire up an app (available for both Android and iOS) that maps out the sky for your location and automatically tells you what you are looking at. Then, you can look for any visible object in the database and the app will show you on-screen directions that will guide you to it. While the Starsense telescopes do not center or track the objects automatically, the instructions are easy to follow even for a beginner. They are also considerably cheaper than a motorized scope.
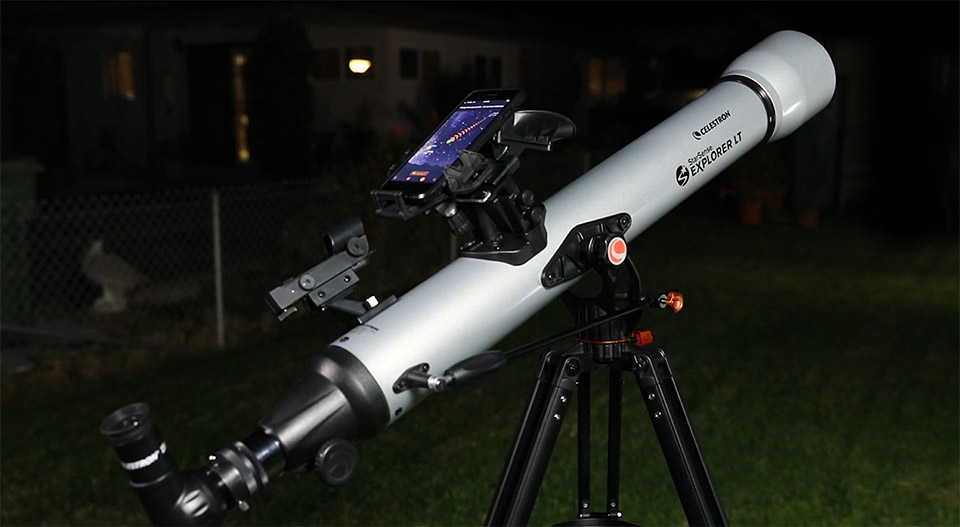
I’ve had the chance to test their refracting base model, the Celestron StarSense LT 80AZ and in this review, I’ll answer a few questions about it. Is it worth the money? Does it solve the problem it is trying to fix? Is it a good beginner telescope?
The verdict
If you are in a hurry, here is a quick rundown.
The Celestron StarSense refracting telescopes are currently my go-to recommendation for anyone getting a telescope for the first time. The StarSense tech makes a world of difference in the level of enjoyment that you will get from a telescope as a beginner. It allows you to focus on actually observing celestial bodies instead of spending half the night trying to figure out where they are.
The optic quality of the telescopes is very reasonable. While the StarSense LT 80AZ is not a high-powered device by any means, the lenses and materials are high-quality.
When compared with other 80mm refracting telescopes I’d say the StarSense LT 80AZ performs above average. It offers bright, sharp, and high-contrast images.
The price is higher than other 80mm refractors, but that’s mostly because of the StarSense technology. The app is included with your purchase and does not require any kind of subscription or additional micro-transaction.
In general, you can’t go wrong with any of the Celestron StarSense telescopes, but if you are a beginner I’d recommend getting one of the refracting ones (the LT 80AZ or the DX 102AZ) because they don’t require any maintenance and are a bit easier to use. Speaking of the 102mm model, it offers more power and a slightly better mount. I believe the price jump is not worth it so I’d recommend this one (the 80mm) over it, but if you have the budget for it, it is a solid option too.
Ratings
| Optics | 9 |
| Build quality | 8 |
| Ease of use | 10 |
| Portability | 8 |
| Innovation | 10 |
| Accessories | 6 |
| Price |
Technical Specifications
The tech specs of the Celestron StarSense LT 80AZ are pretty good for its category. It is an above-average 80mm telescope that offers solid performance. But it is still considered to be in the entry-level classification because of its small size. However, its true value, and what makes it stand out is in the sky mapping functionality so looking just at these numbers won’t give you the full story about this device.
That being said, here are the specs.
| Model name | StarSense LT 80AZ |
| Manufacturer | Celestron |
| Telescope type | Refractor |
| Aperture | 80 mm (3.155″) |
| Focal length | 900 mm (23.6″) |
| Focal ratio | f/11 |
| Assembled Weight | 9.2 lb (4.17 Kg) |
| Eyepiece slot | 1.25″ |
| Maximum magnification | 189x |
| Limiting magnitude | 12 |
| Included eyepieces | Kellner 25mm, Kellner 10mm |
| Tripod | Aluminum |
| Mount | Altazimuth |
| Other included accessories | Mount, red dot finder, star diagonal, 2x Barlow lens, smartphone dock |
Review
Let’s start by explaining the specifications.
The 80 in the name refers to an aperture of 80mm. This is the most important number in any telescope as it determines the amount of light that it can capture. The more light, the more detailed the image.
80mm (3.15″) is on the lower side of things, but it is not bad. The minimum that I personally recommend for an entry-level scope is 70mm so it is ok. This aperture will allow you to reach a maximum magnification of 189x and a limiting magnitude of 12 which means you should be able to see all the planets in the Solar system (although you won’t get much detail out of them) and all of the more prominent and brighter galaxies, nebulae and deep space objects.
The StarSense LT 80AZ is a refractor telescope. This is the most popular type of telescope for beginners and the one I recommend because they don’t require any maintenance, are lighter which makes them portable in case you want to them to the field, and they resolve sharper, and brighter images. You can learn more in this article about the pros and cons of refracting telescopes.
I really like the 900mm of focal length Celestron decided to use for this model. Usually, telescopes in this aperture and price range stick to 600mm-700mm to save some costs, and while those are ok, having the extra length results in a narrower field of view which is more optimal for viewing planets which is going to be one the main uses for this type of scope.
The mount included with the LT 80AZ is an Alt-Azimuth one. This is also my recommended type of mount for beginners (see the pattern here?) as it is more intuitive than EQ (equatorial mounts). The trade-off is that it not very precise when it comes to tracking objects across long periods of time so long-exposure photography is out of the question but that’s probably not something you are going to be doing with this telescope anyway.
Really, the main feature of this model is the StarSense sky mapping technology. It really makes life so much easier not just for newcomers but even for experienced stargazers like myself. I found myself having so much fun using it. I think it will help kids stick around with the hobby as it really removes a lot of the frustrations that I remember having when I first started using a telescope.
The StarSense is more expensive than another model with comparable specs due to the addition of this functionality so if you have the budget for it, you might find yourself trying to decide between it and a more powerful telescope as it is more in the range of a standard 90mm-100mm. My recommendation is: get this. The ease of use that you’ll get out of it trumps the slight difference in magnification power.
The one thing I would have liked to see improved is the accessories. It comes with two Kellner eyepieces (25mm and 10mm) and a 2X Barlow lens. These are perfectly fine and of decent quality, but at the slightly more premium price tag that this telescope is going for I would have liked to see a couple of Plossl eyepieces (read Plossl vs Kellner eyepieces for more on that). This is not a deal breaker and eyepieces can always be upgraded easily, but it would be a nice upgrade.
Finally, let’s talk about its big brother, the DX 102AZ. That is also a refracting telescope and is the same in many ways except for the larger aperture (102mm) and a slightly better mount. Both upgrades are nice, but honestly, I don’t think the steep jump in price is worth it unless the price tag is no problem for you.
Conclusions
To conclude. The Celestron StarSense telescopes have become my top recommendation for entry-level and first-time telescope users. You really can’t go wrong with them.
Who is it for?
- First-time users
- Kids
- People looking for a portable secondary telescope that is easy to use
Who it isn’t for
- People looking to get the max amount of power possible
- Experienced users looking for an advanced device
Is it worth it?
Yes, I’d definitely recommend it. That’s why I also have it as my top pick for the best telescope for teenagers and best refractor telescope for beginners.
Where to buy
Enjoyed this article?
Get daily 10-minute PDFs about astronomy to read before bed!
Sign up for our upcoming micro-learning service where you will learn something new about space and beyond every day while winding down.


 review")