
The number of people getting into stargazing in recent years has increased dramatically. The resurgence in space exploration programs from both private and public sectors has made many of us look at the sky once again.
But choosing a telescope to get started can be a daunting task. Especially when you are on a fixed budget of let’s say $200. You start by reading about all these concepts that seem complicated like aperture, focal length, etc. Then you find there are many different types of telescopes like refractors and Newtonians, and each of them has its own variants. But wait, you are not done, you still have to choose what type of mount you want and which accessories you should prioritize…
It can seem complicated for a beginner. But it’s not that hard and it is absolutely worth it, I promise. Stargazing is a wonderful hobby where you can learn a lot, but that is also extremely relaxing and even a bit therapeutic.
That’s why I have built this buying guide that assumes no prior knowledge and will help you through the whole process of selecting the best telescope under $200 dollars.
Summary
If you just want to skip to the picks, here they are.
Best telescope under $200 – Celestron StarSense Explorer LT 80AZ.
The StarSense technology is the best way for a beginner to learn without complications. It takes out many of the frustrations and complications of getting started with stargazing.
Best Newtonian – Orion StarBlast II 4.5 EQ
Powerful Newtonian scope for people looking for the maximum possible magnification in this price range.
Best Portable – Hexeum 80mm
A compact and lightweight device with decent optics and an excellent price-to-value ratio.
Best for kids – Celestron StarMaster 70AZ
Perfect beginner’s telescope with solid optics, compact body, and easy to use.
How to choose a telescope under $200
There are a few factors that you will want to prioritize when it comes to choosing any telescope, but since we are on a fixed budget, the following are going to be the most important ones.
Aperture
Aperture is the most important number that you want to look at when choosing a new telescope.
The aperture of a telescope is the diameter of the main lens or mirror. It is the most important specification to consider because it is going to determine the maximum amount of light the device can capture. A large aperture can make up for limitations in all of the other specifications of a telescope, and in contrast, no matter how good all the other components are; if the aperture is small you will never be able to get detailed images past a certain point.
When it comes to aperture, more is always better. If you find yourself trying to decide between two telescopes that are otherwise the same, pick the one with the larger aperture.
If you want to learn more about aperture, check out our complete guide here or this comparison with photos so you can get an idea about what you can expect.
Telescope type
There are quite a few types of telescopes, but for the purpose of this article, we are going to focus on the two types that are going to be the most predominant in the $200 price bracket.
Refracting telescopes – This is the type of telescope that I recommend the most for beginners. It is also the image that generally comes to mind when you think of a telescope. A large, thin tube with the exit pupil at the end.
Refractors are easy to use, don’t require maintenance, and offer great optical performance.
On the other hand, they tend to show chromatic aberrations, which is a dramatic way of saying they sometimes show slightly incorrect colors or halo rings around some objects. This effect is going to be reduced greatly on high-quality lenses so it is important to pick a trustable manufacturer.
They are also expensive when you do a price per aperture length comparison. This is because the lenses they use get very expensive quickly as they grow in size. As a result, they are generally only manufactured in 50mm-120mm sizes.
Learn more in this article about the pros and cons of refracting telescopes.
Newtonian telescopes – Newtonians are the most common subtype of reflecting telescopes.
They are popular because they can be built in large sizes for cheap, which means you can get more power for your buck.
They also fix chromatic and spherical aberrations when compared to refracting telescopes.
But these advantages don’t come without some disadvantages. Newtonians require constant maintenance and cleanup, which makes them less user-friendly for kids. They also have heavier tubes, making them less portable.
Here’s a whole article on the pros and cons of reflecting telescopes if you want to learn more.
Focal length
Focal length is not too relevant in this price bracket, but there’s no harm in learning what it is.
The focal length is the distance the light travels in the telescope from the main mirror to the eyepiece. In refracting telescopes, it is going to be almost equal to the length of the tube but in other telescope types that fold and bounce the light inside the tube, it might vary.
A longer focal length is not necessarily better. In fact, for some use cases like astrophotography, a “fast” telescope with a short focal length is preferred.
For amateur telescopes, a long focal length is recommended as it is slightly better for planetary viewing but it is not a huge difference. Don’t worry too much about focal length at this point.
Mount type
There are two types of mounts for most tripod-supported telescopes. These are AZ (Alt-Azimuth) and EQ (equatorial) mounts. Neither is better than the other, this choice is going to be more about personal preference.
Alt-Azimuth mounts are the simplest and easier to use. They are basically “point and shoot” and are more intuitive for beginners. The disadvantage is they are not good at tracking objects as they have some limitations on precision.
Equatorial mounts have a steeper learning curve and many people find them a bit frustrating at first. The good news is they “grow” with you as you gain experience stargazing and long-term the time you put into learning to use them pays off as they offer more precise tracking.
There is no wrong option here, they are both good designs. The decision depends on what you want your experience to be. For kids, we do recommend AZ mounts though. They will have more fun using those.
Best telescopes under $200
Best telescope under $200 – Celestron StarSense Explorer LT 80AZ
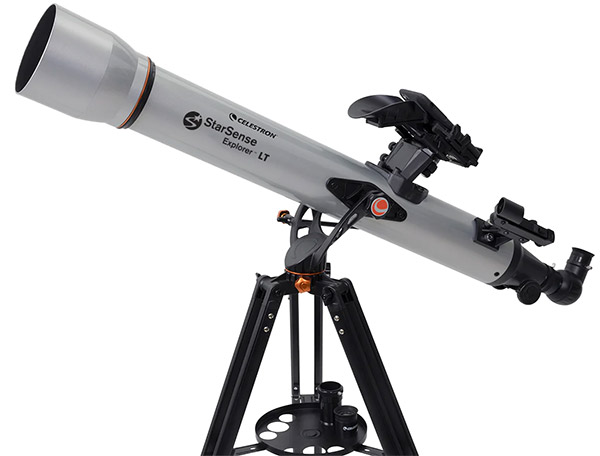
The StarSense technology is the best way for a beginner to learn without complications. It takes out many of the frustrations and complications of getting started with stargazing.
After seeing first-hand how the StarSense tech made the experience of using a telescope for the first time for my niece much more enjoyable and easy, I haven’t stopped recommending it as the best way to get started.
How it works is pretty simple and it is a modern approach to stargazing. You simply connect your smartphone to the adapter that is attached to the telescope. Fire up the StarSense app and follow the instructions so it can figure out your precise location and viewpoint. The app will then map out the sky and show you what constellations, planets, and objects you are looking at. It will also offer you a database with all the visible objects in the sky at the very moment and will show you directions on how to point your telescope to locate them.
It removes all the initial guesswork and frustration of learning how to locate objects and lets you focus on simply enjoying the view.
The telescope is a solid 80mm refractor that uses the same materials and lenses as the Celestron AstroMaster line so you can expect good build quality and bright views.
While the aperture is not huge, it is reasonably good for planetary viewing and will also allow seeing the brighter deep space objects like the Andromeda galaxy and some of the more prominent nebulae and star clusters. Saturn’s rings should be visible. Neptune and Uranus might be visible under perfect sky conditions. This article on what to expect out of a 70mm telescope has some photos that will give you a good idea of what you will see, except this 80mm telescope is slightly better.
While there are cheaper 80mm telescopes, what you are paying for here is the StarSense tech. I honestly believe that it makes the experience of stargazing so much better that it is worth the cost.
If you are looking for more power, check out the 114mm Newtonian version.
Alternative retailers: Optcorp
Best Newtonian telescope under $200 – Orion StarBlast II 4.5 EQ
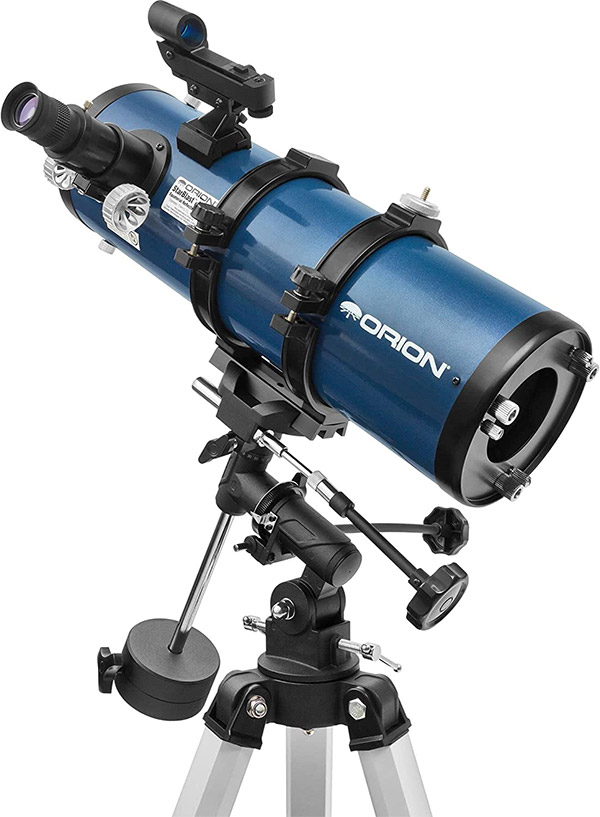
Powerful Newtonian scope for people looking for the maximum possible magnification in this price range.
If what you are looking for is the maximum possible magnification and aperture in the under-200 price range then a reflecting/Newtonian telescope is the way to go. Reflectors have the best aperture-to-price ratio out of all the popular consumer telescopes.
Orion is a very trustworthy brand. The only reason they aren’t as well known as Celestron in North America is that they are a UK-based company, but their products are equally as good and in some cases better.
An aperture of 114mm (4.5″) will give you a good view of all the planets in the Solar system up to Saturn and its ring. Neptune and Uranus are visible but they are very far so getting much detail out of them is really hard even with professional instruments but under perfect circumstances, you might even get a glimpse of Triton.
The Orion StarBlast II has a limiting magnitude of 13.5. This means that bright deep space objects like the Triangulum Galaxy, the Orion Nebula, the Leo triplet, or the Carina Nebula will be perfectly visible.
This telescope comes bundled with two really good Plossl eyepieces (25mm and 10mm) which is always welcome as you will not feel the need to replace them for better models anytime soon.
The Orion StarBlast is a solid telescope that will grow with you as you learn. The initial learning curve is a bit harder considering it will require you to learn how to collimate it and clean it to keep it in top shape, but the better views are worth the effort.
Alternative retailers: Optcorp
Best portable telescope under $200 – Hexeum 80mm
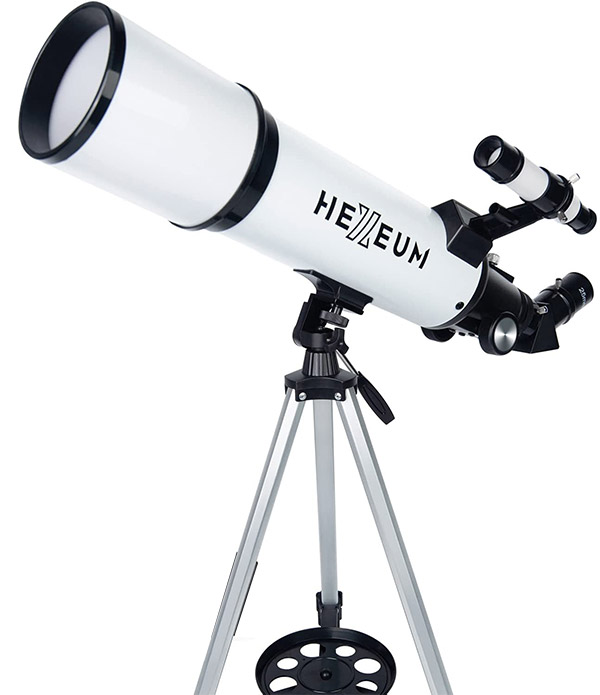
Compact and lightweight device with decent optics and an excellent price to value ratio.
The only category of telescopes where bigger isn’t necessarily better is travel telescopes. Here, you have to consider size and weight as important factors in your decision, and it can get tricky as that usually means that you will have to sacrifice power for portability.
I’ve experimented A LOT with many travel telescopes and have found that the 80mm aperture and 600mm-700mm focal length is the sweet spot that gets you enough power that you will be able to get decent views while still being very easy to carry as the devices in this range are very compact.
So I looked for a model that would fit those specifications while staying on budget and found the Hexeum 80mm.
Hexeum is a brand that focuses on entry-level instruments. I have recommended it before as a solid option for people looking to get into stargazing without breaking the bank.
Let me make something clear. The views you are going to get out of this are not going to be anything special, but within its category and range of specifications, it is a good device with a great price-to-value ratio.
With it, you will be able to see all the planets up to Saturn and its rings. Neptune and Uranus might be visible under good sky conditions but you will only see them as a blue dots.
Some of the more prominent deep space objects are also visible. You should have no problem taking a look at the Andromeda Galaxy or the Sombrero Galaxy which is considerably farther away.
Best telescope for kids under $200 – Celestron AstroMaster 70AZ
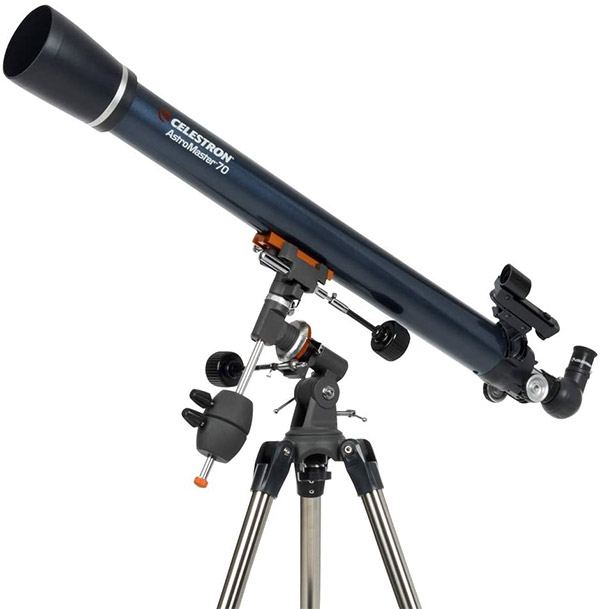
Perfect beginner's telescope with solid optics, compact body, and easy to use.
An aperture of 70mm is the minimum I’d recommend for a basic telescope, even for kids. Any less than that and the views are going to be too limited and the experience will not be enjoyable.
I’d also definitely recommend a refracting telescope if a kid is going to be the main user. They don’t require any maintenance and are much easier to use, especially when you combine them with an Alt-Azimuth mount like in this device.
The AstroMaster 70AZ is probably my most recommended telescope for beginners across the site. It meets all the requirements that you could possibly want to get started and its price is very reasonable so you don’t feel like you are committing too much to it. This is important when you are planning on gifting it to a kid because you don’t know if they are going to be using it regularly or if they are going to use it once and forget about it. That is another reason why it’s so important to get a reasonably good telescope so they have a good experience with it and are incentivized to stick with the hobby and learn more about the universe.
The AstroMaster 70AZ comes with two eyepieces (20mm and 10mm), a star diagonal, and a red finder scope.
The optics are solid as you would expect out of Celestron. I’ve personally tested one a few times and have never seen any significant chromatic aberration besides a few details here and there but that is more due to the achromatic design than the quality of the parts.
This is a great beginner’s device that will last for many years and kids will surely enjoy it.
Alternative retailers: Optcorp
Suggested accessories
I’d recommend checking out the following accessories to get the most out of these telescopes:
Enjoyed this article?
Get daily 10-minute PDFs about astronomy to read before bed!
Sign up for our upcoming micro-learning service where you will learn something new about space and beyond every day while winding down.


