
Refractors are the most popular type of telescope for beginners.
They are easy to use, require zero maintenance, and are very good at displaying high contrast, bright images.
While they do have certain disadvantages, for people looking for a “point and shoot” kind of telescope, refractor telescopes are the obvious choice. (Check out our article about the pros and cons of refractor telescopes if you are looking for the details).
But now that you have chosen what type of device you want. Which one is the best refractor telescope?
I have tested more than 20 of them for reviews, personal usage, and as gifts. So in this article, I’ll give you the list of which ones I believe to be the best entry-level option based on price, value, optics, and durability.
If you are in a hurry, I’ll save you some time and show you the best choice right away.
Best refractor telescope for beginners – Celestron StarSense Explorer DX 102AZ
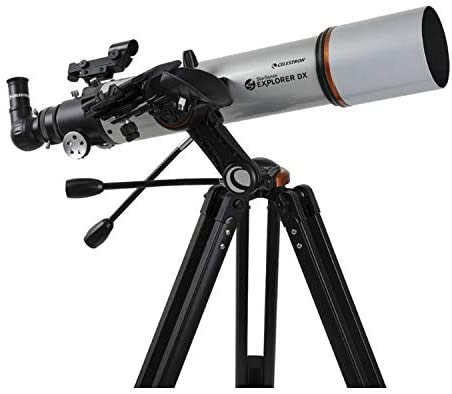
Includes star recognition technology that automates the hard parts about stargazing so beginners can spend more time enjoying their time watching the sky.
| Specifications | Value |
|---|---|
| Manufacturer | Celestron |
| Aperture | 102mm |
| Focal length | 660mm |
| Limiting magnitude | 12.5 |
| Highest magnification | 240x |
| Mount | Alt-Azimuth |
The StarSense line by Celestron simply has the best telescopes for beginners. Period.
Leaving things such as optics and build quality aside – which are good, but more on that later – the most important feature of a first telescope is how much is it going to help you learn and how enjoyable is it going to make your experience as a rookie stargazer.
The StarSense telescopes allow you to connect your smartphone to the mount. Start the free sky recognition app (available on iOS and android), follow the instructions, and it will automatically detect your position and it will map out the night sky that you can see from there. Then not only will it mark on the screen the names of the stars and constellation you are looking at, but it will let you open a database of the visible objects for that night and will guide you on how and where to point the telescope to view them. This solves one of the major issues beginners have which is figuring out where the objects that you want to see actually are. I remember the first few times I used a telescope I spent a frustrating amount of time trying to find the objects instead of actually watching them. This technology solves all that.
The rest of the telescope is pretty much a regular refractor. It is available in 80mm, and 102mm apertures. Both are solid choices and include the same accessories but the latter is considerably more powerful.
The included eyepieces are two Kellners. A 10mm and a 25mm. These give you a magnification of 26x and 66x respectively. Since the highest magnification of the telescope is considerably larger at 240x, you will probably want to get a couple of eyepieces with more power. To reach that magnification you can use eyepieces with a focal length up to 3.5mm. Remember that lower eyepieces = more magnification. Check out our magnification calculator if you want to figure out if an eyepiece is a good fit. Another option would be to instead get a Barlow lens that will allow you to double the magnification the included eyepieces offer. The Celestron Omni 2x that we have reviewed before would be a good choice for this.
At 660mm (2.1 ft) the focal length of the StarSense Explorer is short enough to keep the tube compact and lightweight. This makes the telescope a good choice to take it out on the field where the tech becomes even more useful.
The price of the StarSense explorer is higher than that of a comparable telescope by about 20% due to the value added by the sky recognition app. You can compare it for example to the Omni XLT 102AZ which is basically the same telescope without the StarSense tech. I believe the StarSense tech is definitely worth the higher price tag, especially for beginners.
Are refractor telescopes good?
Yes! refractor telescopes have many advantages that make them a great choice, especially for beginners and for astrophotography.
Some of the pros that refracting telescopes have over other designs are:
- Refractors use lenses instead of mirrors. This generally results in better contrast and brighter images.
- They have small tubes, making them lightweight and easier to travel with.
- Refractors don’t require collimation or inner maintenance like Newtonian telescopes.
- They require less temperature acclimation time.
- Refractors are more beginner-friendly because of their low maintenance requirements. They also tend to come with alt-azimuth mounts that are easier to use.
How to choose a telescope for beginners
It can be intimidating to take a look at all of the technical specifications in a telescope and look at all those numbers without knowing what each of them means or which matters the most.
But choosing a telescope is not that hard. You just need to follow a few general guidelines like the ones detailed below and you should be able to make an informed choice.
First of all, since this article focuses on refractors, I am going to skip the part about choosing what type of telescope is better for beginners. Refractors are a good choice, there’s no need to second-guess that.
But which refractor should you pick? Well, the most important thing to consider is to prioritize the following.
- Aperture – This is the most important number in any telescope. It refers to the diameter of the frontal lens. Since this is the lens that is going to capture the light, its size is going to determine the amount of it the device is going to capture. The bigger the aperture the better. A piece of broad advice for selecting a telescope is to prioritize your budget to always get the largest aperture you can afford. There are obviously a few exceptions to the rule, but as a beginner, following it will be the best choice.
- Usage to focal length relationship – Where do you plan to use the telescope? in the backyard? do you want to take it on camping/hiking trips?. This is important to determine because it will help you determine the size that works best for you. In a refractor, this is going to be determined by the focal length. A short focal length results in a more compact telescope that is more portable. Focal length doesn’t need to be long to be better. As a matter of fact, short focal lengths are slightly better for deep space observing and astrophotography while longer focal lengths are better for planetary viewing.
- Type of refractor – There are two types of refractor telescopes. Achromatic and apochromatic (APO). The first one is the most popular kind because it is based on the original refracting design invented in the 17th century and is less expensive. Apochromatic telescopes add one or two additional lenses. This fixes the optic issues refractors can sometimes display, but it comes with the disadvantage of a higher price tag. As a beginner, my recommendation is to stick with an achromatic refractor and spend your budget getting one with the largest aperture your budget allows. There is only one exception and that is if you are specifically looking to get started with astrophotography from the start. Apochromatics are much better for that specific use case. Just know that you will probably have to be willing to spend considerably more to grab one.
- Brand – The manufacturer does matter when it comes to telescopes mainly for one reason. Not all lenses are created equal. The quality of the lenses in your telescope matters a lot and is going to determine a lot of your viewing experience. Budget manufacturers cut corners using sub-optimal coatings on their lenses or even skipping coating them at all.
How the telescopes in this list were selected
All the devices mentioned have been personally tested by me to select the best refractor telescope for beginners.
I do not currently own them all but have gotten access to them by borrowing them from friends, trying them at astronomy meetups, or getting them temporarily for review thanks to the brands.
I’ve tested more than 20 refractors specifically for this list, sorted them based on categories, and chose the one that offers the most value for each use case.
I used both the included eyepieces and accessories as well as my own collection as a control group so I could measure the difference in performance objectively.
If you’d like to know more about my credentials to make this buying guide, there’s more information on the about me page.
Best value – Celestron AstroMaster 70AZ
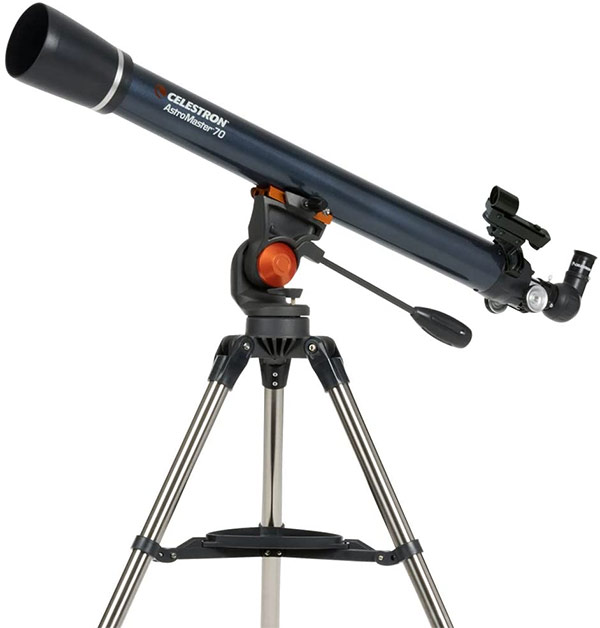
Entry-level refractor with solid optics and great price to value ratio.
| Specifications | Value |
|---|---|
| Manufacturer | Celestron |
| Aperture | 70mm |
| Focal length | 900mm |
| Limiting magnitude | 11.7 |
| Highest magnification | 165x |
| Mount | Alt-Azimuth |
If you have read other of our other buyer’s guides you know the AstroMaster 70 AZ is one of our most recommended items. You can’t go wrong with it if you are looking for a solid first-time buyer kind of telescope.
70mm is the minimum aperture that I’d recommend for a telescope (excluding maybe the kids category). Anything less than that is just going to result in a poor viewing experience that won’t do any justice to the objects you can see with just a slightly more powerful instrument.
Despite being an entry-level telescope, the optics are very reasonable. I have a trained eye and I was barely able to detect any of the color errors that refractors can sometimes show. As a beginner, this is something you will not even be able to notice.
The build quality is solid. The tube uses the same materials as the more expensive versions of the AstroMaster line. The frame is light but sturdy and when fully assembled the whole thing weighs only about 11 pounds (5 kg).
With a 70mm telescope, you will be able to observe all the planets in the Solar system although you might not get much detail beyond Jupiter. The Moon is an excellent target and you can expect to see all of its craters and geological formations.
Some of the brighter deep space objects like the Orion nebula and the dumbbell nebula can be seen with a decent level of detail.
Check out this article on what you can expect to see with a 70mm telescope for some images taken with a very similar telescope.
Best Budget Pick – HEXEUM 80mm
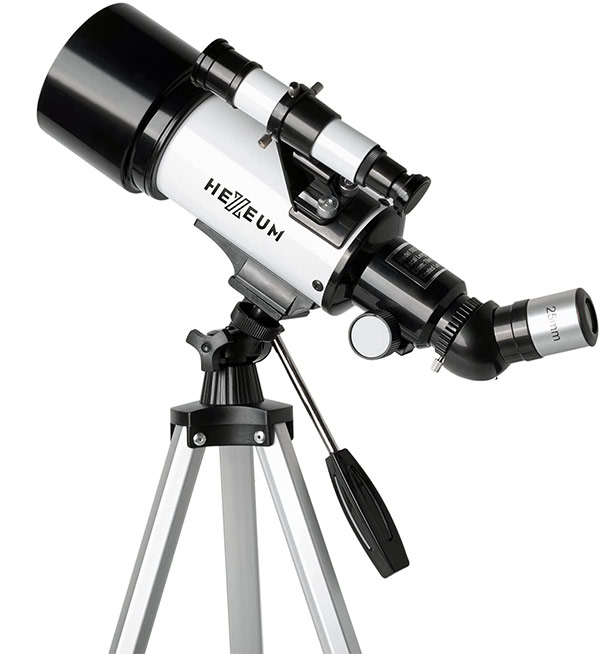
Excellent pricing for the good optics and the amount of accessories it comes with. Solid option if you don't want to spend too much or if you are looking for a portable refractor to use as a secondary telescope.
| Specifications | Value |
|---|---|
| Manufacturer | HEXEUM |
| Aperture | 80mm |
| Focal length | 600mm |
| Limiting magnitude | 11.9 |
| Highest magnification | 160x |
| Mount | Alt-Azimuth |
HEXEUM is an optics brand that focuses exclusively on products for the entry-level market. And they do quite a good job at it.
This telescope is the 80mm version of their refractor line. They also make 70mm and 90mm versions, but I believe this is the one that hits the right spot between value and price. The 70mm version feels a bit too underpowered while the 90mm is slightly too expensive.
But this one offers very solid performance at a very reasonable price.
It is easy to use, fast to set up, and doesn’t take too much space so it is very portable.
The included eyepieces, just like the AstroMaster above, are 10mm and 25mm Kellners. But unlike that telescope, this one does include more accessories. It includes a 3X Barlow lens, a smartphone adapter with a remote, and even a carry bag. Those added features are the things that make the HEXEUM 80mm have such good value for the money.
The only reason why the HEXEUM isn’t our pick as the best value telescope is because it slightly underperforms when it comes to optics. I did detect some minor chromatic (color) errors and the images are slightly dim. Neither of those is too bad, but if you compare them side by side, the difference is noticeable. The focal length is also shorter which means its performance in planetary viewing also suffers a bit.
On the other hand, the extra 10mm of aperture are nice and gives you access to some more deep space objects to watch.
In conclusion, as long as you understand that this is definitely a budget telescope that has limitations, it is a good choice. It does a good job at being a first telescope to start learning with.
Best for astrophotography – SVBONY SV48P
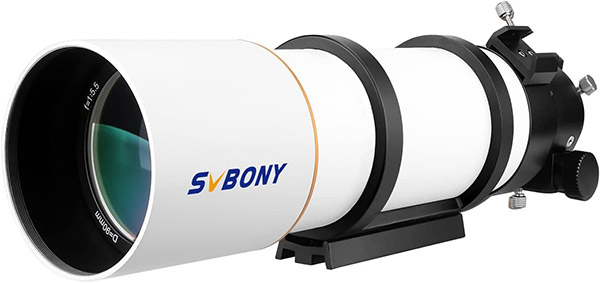
Premium Optical Tube with amazing optics and all the necessary features to assemble a powerful astrophotgraphy setup.
| Specifications | Value |
|---|---|
| Manufacturer | SVBONY |
| Aperture | 90mm |
| Focal length | 500mm |
| Limiting magnitude | 12.1 |
| Highest magnification | 185x |
| Mount | N/A |
Beginner or not, choosing a telescope for astrophotography is a bit more nuanced than selecting one purely for stargazing. There are more things to take into consideration besides just the aperture of the lens.
For example, focal length plays a big role. Short focal lengths yield the best results because a lower focal ratio means brighter images.
While this is not an apochromatic telescope, it still uses doublet achromatic lenses, resulting in very sharp, high-quality images.
Astrophotography telescopes are generally only sold as the OTA (Optical Tube Assembly). They include no tripod/mount or eyepieces. This is because they are designed to give you more freedom to choose the accessories you want to pair it with and because they are made to work with a telescope camera or a DSLR. You can still use regular diagonals and eyepieces as it comes with an adapter to fit 1.25″ accessories, but you will have to get them separately.
When you select a tripod make sure the connector matches the one in the tube. In this case, the SV48P uses a dovetail rail. Here’s a quick guide on how to match them. A good Alt-azimuth mount that works well with it is the SVBONY SA402.
All in all, this telescope offers impressive optics and is really worth the money both as a stargazing instrument and to get you started with astrophotography. Even though it is more expensive than the other items on this list, it still offers good value for what it does as it can generate images almost as good as the high-end apochromatic refractors at a lower price.
Enjoyed this article?
Get daily 10-minute PDFs about astronomy to read before bed!
Sign up for our upcoming micro-learning service where you will learn something new about space and beyond every day while winding down.


