
$500 dollars is a lot of money. But investing them in a telescope can definitely be worth it. At this price range, you can get a very powerful device that goes well beyond the “entry-level” category and is much closer to the “very serious enthusiast” side.
This is also the price range where you can start to think about advanced and specialized features that you can choose from depending on the primary use that you want. For example, you can go for the maximum possible power and select a large aperture scope of up to 150mm. Another option is to get a computerized telescope that can automatically track objects for you. And if you want to get into astrophotography, you can pick a fast, doublet, or triplet refractor with amazing optic quality.
However, choosing the best telescope under $500 that fits your needs can be tricky as there are so many options and types to choose from.
The good news is that I have done all the homework for you. Thanks to being an astronomy writer, I’ve had the chance to personally test all the most popular telescopes in this category and compared them side to side to figure out which ones offer the best value, optics, and features.
Summary
If you just want to skip to the picks, here they are.
Best value – Celestron AstroMaster 130EQ + Accessory kit. A powerful mid-range Newtonian telescope that is considerably below budget, which allows us to add a whole kit of high-quality eyepieces and filters.
Best for beginners – Celestron StarSense Explorer DX 130AZ. The StarSense telescopes come with a smartphone dock and include sky-mapping technology to make objects easy to find.
Most powerful – Orion Skyquest XT6. The telescope with the most magnification that you will find in this price range. Great optics quality too.
Best for astrophotography – SVBONY SV503. Incredible optics thanks to its Extra Low Dispersion lenses. It can go toe to toe with more expensive models.
Best portable/travel telescope – Sky-Watcher StarTravel 102 AZ3 – Light but very powerful refractor with excellent optics. It can also be considered an entry-level astrophotography device.
How to choose a telescope under $500
There are a few factors to consider when choosing a telescope in order to make sure that your money is well-spent. If you are upgrading from a basic telescope you might already know a lot of this but it is always a good idea to brush up on your knowledge.
If this is your first scope, you will definitely want to keep on reading.
Telescope type
Not all telescopes work the same way. Even if they look similar from the outside, they can use different lens configurations and designs to transmit light as accurately as possible without adding visual errors.
There are two basic telescope types. Refractors and reflectors. From those two other sub-types are derived and there are even some hybrid models.
There is no “best type” of telescope. They all have their pros and cons. We have extensive articles about that for both refractors and reflectors but here are some quick guidelines that might help you choose.
- Refractors are easier to use and maintain but they are expensive to produce in large apertures.
- Reflectors offer more power and precise optics at the expense of portability, brightness, and occasional maintenance.
Aperture
Aperture is the most important specification for any telescope. It is the diameter of the main mirror and it is going to determine the maximum amount of light the device can capture. No matter how well-manufactured a lens is, at some point, it is just not possible for it to capture any more detail than what its aperture supports.
If you want to maximize the power (magnification) that a telescope can achieve, then you need to get the one with the largest aperture that your budget allows for.
Aperture is also going to determine a lot about the price of a telescope. Manufacturing large telescope lenses and mirrors is very expensive so you will notice high price jumps between apertures, even if the difference is only 20mm-30mm (less than 1″).
Mount type
The mount of a telescope is the part that connects the tripod to the tube and controls the movement.
There are two main types of mounts, Alt-Azimuth and Equatorial but they are generally abbreviated as AZ and EQ.
In short, AZ mounts are easier to use. They are basically “point-and-shoot”, but they are less precise and have limitations when it comes to tracking objects.
EQ mounts fix all that, but they are considerably harder to use.
For a first-time user, an AZ mount is usually recommended. However, once you get through the basics and start to get more serious about stargazing, they can become a bit of a limitation. EQ mounts have a steep learning curve but they grow with you and you won’t feel the need to upgrade them after learning to use them.
Focal length
Focal length is the distance between the main mirror of the telescope and the exit pupil. This isn’t as straightforward as it sounds because sometimes telescopes will bounce the light inside the tube multiple times, increasing it.
A large focal length decreases the field of view of the final image (the “area” of the sky you can see) and a short focal length increases it. Neither is better, they both have their uses.
In this price range, honestly, you shouldn’t worry much about focal length. It is only a problem when it is too short (under 500mm) and none of the telescopes in this range are going to have that problem.
The only specific use case where it really matters is astrophotography because for that there are many advantages to using a “fast” telescope (short focal length) as it results in more stable images.
Best telescopes under $500
Best value – Celestron AstroMaster 130 EQ + Accessory kit
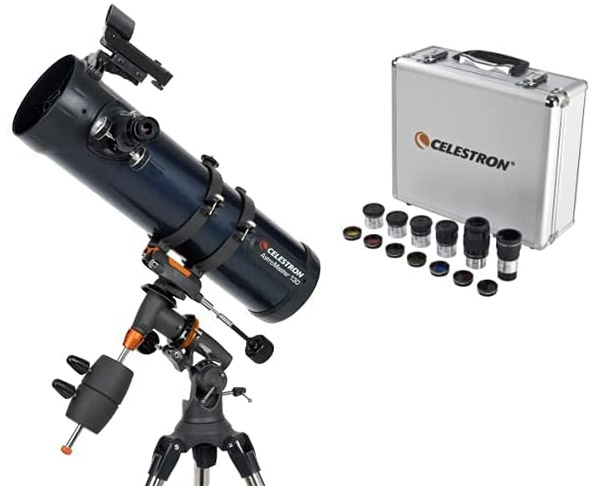
One of the most reliable and popular Newtonian telescopes in the market equipped with all the accessories you could possibly need.
The AstroMaster line of telescopes is probably the number one best-seller in the world when it comes to devices for enthusiasts and beginner stargazers. It has kept that place for years due to its great optics, solid build quality, and reliability.
The 130EQ is the flagship Newtonian in the lineup. It has a generous aperture of 130mm (5.2″) with a focal length of 1,000mm. This results in a limiting magnitude of 12.8 and a maximum magnification of 269x. What does that mean?
Well, it means that – assuming decent sky conditions – when it comes to looking at the planets in the Solar system, you will be able to distinguish some of the different areas on Mars, including its frozen poles. You will be able to see clearly Saturn’s rings separate from the planet, and some colors on Jupiter. Uranus and Neptune are visible but don’t expect much beyond looking at a blue dot.
The major and brighter galaxies, star clusters, and nebulae are visible too. Andromeda, Bode’s Galaxy, or Centaurus A should be no problem.
The Moon is also a great target for this telescope, and since the accessory kit includes a Moon filter, looking at it during the biggest phases will give you a spectacular view of all the major craters.
The AstroMaster 130EQ isn’t close to the $500 budget. It is much more affordable, but I’m recommending it because that extra budget allows you to get the bundle that includes a very complete accessory kit.
If you have read other reviews on the site, you know that I’m constantly complaining about manufacturers including only basic eyepieces with their telescopes to keep costs down and that you have to upgrade the eyepieces separately if you want to get the most out of your telescope. Well, getting the whole accessory kit fixes this from the start. It includes 5 high-quality Plossl eyepieces, a Barlow lens, and a bunch of filters.
Overall, getting the AstroMaster 130EQ with the accessory kit is an excellent value buy that will save you from having to upgrade in the future. Just a note, sometimes (especially around Christmas time) the bundle can be priced over the budget. If you can, wait it out a couple of months and it should go back to the regular price (or go with one of the other options below).
Best for beginners – Celestron StarSense Explorer DX 130AZ
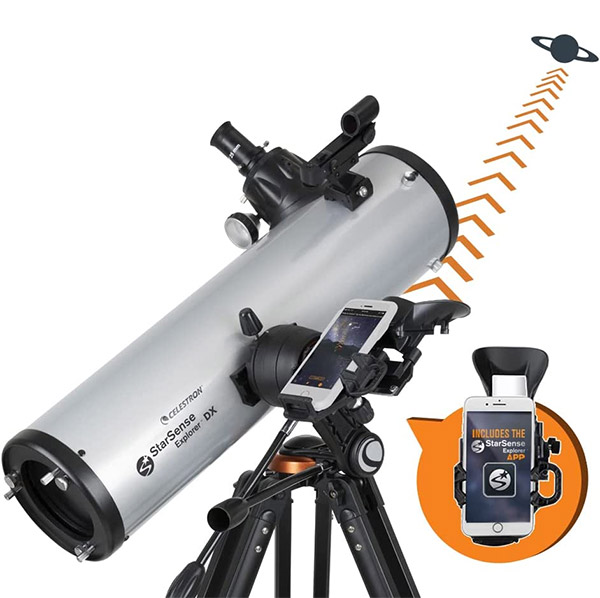
A large Newtonian telescope that makes use of your phone. The assisted StarSense app is an excellent tool for beginners to get a better stargazing experience.
I’ve written in-depth reviews of some Celestron StarSense telescopes before like the Explorer LT 80AZ and the Explorer LT 114 AZ (the budget version of the DX 130 AZ) and they are, in my opinion, the best telescope you can get for someone who is just getting started with stargazing and astronomy.
The StarSense Explorer DX 130AZ, like the rest of the lineup, has a smartphone dock. Once you have docked the phone, the fun part begins. You can use the included app to automatically map out the sky around you. On the screen, you will then see an overlay with the names of all the stars, planets, and other objects in front of you.
You can also search the database of visible objects for that night, and the app will show you on-screen directions to help you point your telescope and center it so you can then watch it through the eyepiece.
The StarSense technology removes a lot of the frustrating parts about using a telescope for the first few times because you no longer need to spend time trying to figure out where the objects that you want to see are.
The DX 130AZ is the largest Newtonian of the lineup. As its name implies, it has an aperture of 130mm. I’m pretty sure it uses the same mirrors as the AstroMaster 130EQ shown above so you can expect good quality out of them.
The included mount is an AZ, which seems weird at first because Newtonians of this size generally come with an EQ. But when you think about it, why would you even need an EQ mount if the app is going to give you all the precise directions you need? It is a decision that does make sense when you look at it that way, but it also means, that if for some reason you want to use it without the app, it becomes less precise.
The DX 130AZ is a premium telescope for any beginner that will help them enjoy the wonders of the night sky. And even though it is a bit expensive for its aperture, I think the value the StarSense app adds makes it worth it.
Most powerful – Orion Skyquest XT6
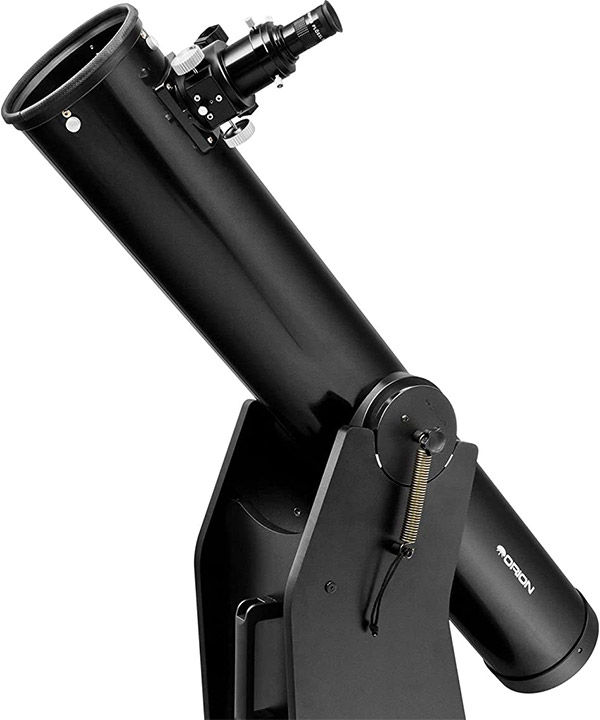
The most powerful telescope that you will find in this price range. At 150mm of aperture, the XT6 is a beast for those who want the maximum level of detail.
If you just want to maximize the power of the telescope and go for the biggest one so you can get the highest possible magnification and level of detail out of your purchase, then a Dobsonian is the right choice for you.
Dobsonian telescopes are famous for being cheap to build, which means that you can usually get a larger aperture for the same amount of money. In essence, a Dobsonian is also a reflector telescope, just like Newtonians. The difference is that they are made out of larger tubes and use a rotating base instead of a tripod for support. This is why they are also known as “light buckets”.
The Orion SkyQuest XT6 fits the budget just right. It has an aperture of 150mm (6″) which results in a limiting magnitude of 13.5 and a maximum magnification of 300x.
That means that when you look at Mars you might be able to start recognizing some of the major regions on the planet and you should be able to distinguish the poles clearly. This is also the minimum tier to start seeing clearly both of Mars’ moons, Phobos and Deimos which are quite small so they are hard to see with smaller scopes.
Jupiter and Saturn look great. You will be able to notice more colors and details on both as well as see the larger moons clearly. Uranus and Neptune will look just like a blue dot as they are too far away to get much detail even at this magnification. The dwarf planet Pluto might be visible, but only with perfect sky and orbital conditions.
You will also gain access to hundreds of deep-space objects including all 110 Messier objects. Galaxies and Nebulae will show more colors and details. I recommend checking out targets like the Pillars of Creation in the Eagle Nebula that start to look impressive at this magnification.
Dobsonians look big and clunky and that scares some people as they look heavy, but they are much lighter than they look. Remember that the tube is mostly empty.
In conclusion, if you want more bang for your buck and all the power you can get, this is the telescope for you.
Dobsonians sometimes go out of stock for some time. In that case, a similarly priced and equally good model is the Sky-Watcher Classic 150.
Best for astrophotography – SVBONY SV503 80ED
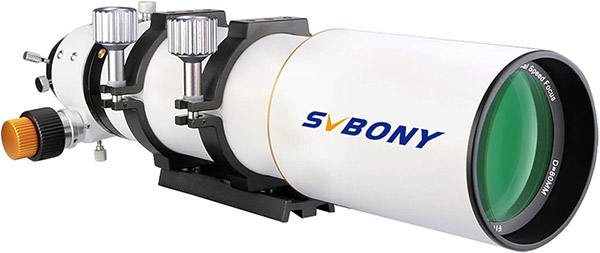
Incredible optics for those who want to experiment with taking amazing shots of the universe without having to spend thousands of dollars.
Astrophotography is an expensive, but very rewarding hobby. It is important to mention this because even in this price range, the only telescopes specifically made for astrophotography that you are going to find are considered “budget” models.
But wait, when you look at the specs of the SVBONY SV503, it only has an aperture of 80mm, how is that good for astrophotography?
Well, in case you don’t know much about cameras, here’s a quick lesson. Cameras are going to benefit from “fast” telescopes. That is, telescopes with a short focal length that can transmit light as quickly as possible. This increases the brightness of the image and the shutter speed. This allows the (modern) camera to take multiple rapid shots in short succession and then create a composite, balanced, sharp image out of all of them.
This makes refracting telescopes perfect for the job. But standard refractors have a problem, they tend to create chromatic and spherical aberrations, which sounds ugly but it just means small errors in color and blurriness in the outer edges. To fix this, modern refractors have implemented novel designs that use multiple “doublet” or “triplet” lenses (two or three lenses stacked next to each other). On top of that, these lenses are manufactured to have low ED (Extra-low dispersion) which solves the chromatic errors.
The thing is, these lenses are hard and expensive to manufacture, so they don’t come cheap. This is what makes astrophotography telescope more expensive than the rest.
Note that this doesn’t mean that you can’t photos. with your other telescopes. Large Dobsonians and Newtonians can take great shots. Consider these types of telescopes more on the specialty side.
SVBONY is a brand you don’t hear much about as they mostly focus on entry-level low-budget models. But recently they have started to incursion on higher-end markets and I gotta say I’ve been impressed with the couple I’ve had the chance to test.
These telescopes are also sold without a mount or tripod to allow you to choose what type you want to use depending on what you want to photograph. If you already own a telescope you might be able to use that depending on the connector but if you want something to get you started, the SVBONY SA402 should do the job.
This telescope also comes with a 2″ eyepiece slot instead of the standard 1.25″. This is to add support to the camera when it is attached, but it does come with a 1.25″ adapter to use standard eyepieces if you ever want to use it as a normal telescope.
Best portable – Sky-Watcher StarTravel 102 AZ3
A premium travel telescope with high-quality optics and advance features. And yet, it can still fit in a backpack.
Sky-Watcher is an underrated company in the telescope market my opinion. They always make products with excellent optics and yet, they are not as well known as other brands.
The StarTravel 102 AZ3 is very well-designed and has the exact features that you would want out of a premium travel telescope.
First, it has a generous aperture of 102mm which is on the edge of what small refractors can support without becoming too heavy or too expensive. Despite this, it has a small body and weighs less than 15 pounds (6.3 kg) when fully assembled.
The optics are great. Even though it is a single-lens refractor, I saw little to no evidence of chromatic aberration. The images are bright, sharp, and high-contrast. The resulting images are some of the best views I’ve seen out of any telescope in this aperture range. I’d say the StarTravel 102 AZ3 is even good enough not just as a secondary travel telescope, but it could even be used as your main device.
Another cool feature of this telescope is that it comes with a 2″ focuser. Usually, portable telescopes are built thinking about planetary viewing, but the StarTravel 102 AZ3 is not afraid to let you test its optic capabilities with deep-space objects. In case you are wondering, 2″ eyepieces are usually built for low-magnification and ultra-wide field-of-view, making them more suitable for looking at galaxies, nebulae, etc. A 1.25″ adapter is also included so using a standard eyepiece is no problem either. In fact, the bundled eyepieces are both 1.25″.
The only thing missing out of the box is a Barlow lens which you’ll have to get separately. There are some recommendations in our article on the best Barlow lenses.
In conclusion, if you want a telescope that you can take to the field and that can still hold its own when it comes to power and optics, look no further.
Enjoyed this article?
Get daily 10-minute PDFs about astronomy to read before bed!
Sign up for our upcoming micro-learning service where you will learn something new about space and beyond every day while winding down.


