
Telescopes don’t have to be updated as often as other pieces of tech (I’m looking at you, yearly phone upgraders). If you take good care of them, they can last you for a decade or even longer.
The problem with telescopes is not that it stops working or that much better tech comes along, but the user becoming a more sophisticated astronomer who wants to start using it in ways they didn’t even know were possible when they made the purchase. In short, the main reason to upgrade an aging telescope is because you are outgrowing it.
Thankfully, it is not always necessary to make a big investment in a brand new viewing device. Before you go and spend a larger sum of money on a telescope, check out the following tips that will help you upgrade your current one and breathe new life into, extending its useful life.
When should you upgrade vs when should you buy a new telescope.
Now, there are certain times when the best choice is really to move on from your old telescope and get a brand new one that has the features you need.
Here are a few rules of thumb as to when each of those options is optimal.
You should buy a new telescope if:
- You have already maxed out your available magnification with eyepieces
- You are planning to upgrade your aperture by more than 50mm (2 in)
- The mirror in your Newtonian telescope broke or got severely scratched. Those can be expensive to replace so you might as well upgrade.
- You bought a “kid’s telescope” and they already outgrew its capabilities.
- You are trying to switch to a different telescope type (refractor to Newtonian, Newtonian to Dobsonian, etc)
- You purchased a fancy-schmancy DSLR camera for astrophotography and your telescope has become a huge bottleneck.
You should upgrade your telescope if:
- You are still only using the eyepieces your telescope originally came with
- You are considering buying a new telescope with less than 50mm of difference to the current one.
- You haven’t tried astrophotography with long exposure times. Here’s a secret, a lot of the amazing amateur images you see online of planets and deep space objects are enhanced by photo techniques, they don’t really look like that under the telescope.
- You still haven’t learned to mix and match your eyepieces.
- All the upgrades you want are based on finding objects faster but your visuals are fine.
If those boxes aren’t all checked and you have decided that upgrading is the best option for you, let us give you the 4 steps you need to follow to do so.
1 – Try different eyepieces
Eyepieces can make or break what you see through your lenses. This holds especially true for amateur telescopes where manufacturers sometimes include cheap eyepieces in order to meet a certain price point. This means the tube in your device can be more powerful than you think. It just needs some help to show you the best it can do.
Let’s start by analyzing magnification.
A telescope has a maximum magnification. This is how “big” can the image be when you look at it. But a bigger magnification isn’t always better. Lower magnifications will allow you to view smaller objects like a planet’s moons or to track moving objects with ease. A bigger magnification becomes useful when you want to get more detail out of bigger objects like planets.
There is a limit to how much magnification you can get from a telescope. Beyond that point, no matter how big of an eyepiece you use, you will not get a better image. if you don’t know what the maximum magnification of your device is, it is easy to figure it out. You will simply need to know your telescope’s aperture as this will be the limiting factor. Then multiply it by 50.
So, for example, if you have a telescope with a 3″ aperture, your max magnification would be:
Max mag = 3 x 50 = 150
Your maximum magnification would be 150x.
Once you know that, you can calculate how much magnification you are getting with your current telescope/eyepiece combination by using this calculator. If you are not using eyepieces that match that number, you can buy an eyepiece that does.
The second consideration when it comes to eyepieces is design.
There are many types of eyepieces. You don’t need to know them all, but your telescope will most likely come with one of these:
- Kellner
- Edmund
- Orthoscopic
- Plossl
If your device came with a Kellner or Edmund RKE eyepiece, you should definitely consider upgrading. Both of those designs are older and only use 2 pieces to project the images instead of the more sophisticated eyepieces that use 4 or more. They were very common in older telescopes but now they have been relegated to budget ones. The difference you will see switching from a Kellner to a Plossl will be significant even if they have similar specifications.
Finally, in order to finish upgrading your eyepieces, try getting a Barlow lens.
Think of a Barlow lens as an accessory to your eyepieces. It is basically an extensor that connects to them and gives you an additional 2x, 3x or 4x magnification depending on which one you got.
What does that achieve? well, a Barlow lens gives you access to a wider variety of magnifications to try. If you have eyepieces with a magnification of 20x and 60x, you would have four available magnifications with a Barlow lens of 2x, these would be the following: 20x, 40x, 60x and 120x.
Pretty much every eyepiece comes in the standard 1.25″ size so you don’t need to worry much about it fitting your telescope.
There are some great sets of eyepieces that include a few plus a Barlow lens for a very reasonable price. Check out for example this one by svbony that covers most of the eyepiece sizes a hobbyist astronomer could need.
2 – Filters, but not the instagram kind
I really like this one. Filters are such an easy and cheap way to improve your viewing experience and yet not enough people use them regularly.
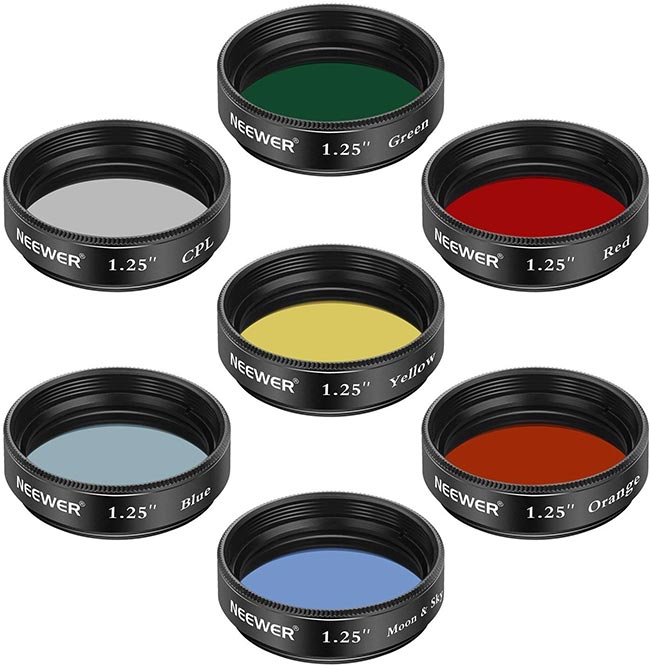
Filters are very simple colored glasses that can be screwed to your eyepieces. Each of them will help you enhance specific types of images.
There are filters for every type of object in the sky. In fact, some of them are specifically made for some, for example, some of the most popular filters are designed to view the Moon. Sometimes during certain phases, the Moon can be very bright. This leads to your view of it losing many details or becoming uncomfortable for your eyes. These lunar filters take care of this by reducing the brightness and helping a good view of our satellite.
Another popular set of filters is Sun filters. These will allow you to look at the Sun through a telescope. IT IS IMPORTANT TO NOTE WE DO NOT RECOMMEND THESE FOR BEGINNERS. LOOKING DIRECTLY AT THE SUN CAN HURT YOUR EYES. These can be useful if you are trying to photograph a solar eclipse or if you want to catch an object passing in front of the Sun like the International Space Station.
One of the best things about filters is they come in only one standard size (1.25″) which is also the regular size for any eyepiece. This means your filters can be inherited from telescope to telescope and used by all your eyepieces. If you take good care of them, you will only need to buy them once or twice in your lifetime.
Telescope filters are better bought in sets. If you buy them separately they’ll be more expensive. It is only worth it if you are trying to get one specialized filter.
Finally, filters are one type of item where the brand doesn’t matter as much. There isn’t much difference between the quality of super expensive filters and budget ones. In fact, the filters I use the most from a couple of dozens I have tried are from this very reasonably priced set from the mostly unknown brand Neewwer.
3 – Improve your astrophotography game
One of the best ways to get more juice out of your telescope is improving your photography gear.
What kind of upgrade you need here will depend on what you have already tried in this area.
If you have never even tried taking photos with your telescope, well, you are missing out. It’s one of the best ways to enhance this hobby and the skill you will learn translate to other types of photography.
If this is you, the first and only thing you need to get is a smartphone or camera adapter so you can hook up your device. We could go into details about this, but we already covered all of this and more in our beginner’s article on how to take photos with your telescope.
If you are already past the beginner’s stage, there are still a few tricks you can learn without having to buy a brand new camera or smartphone. This article on astrobackyard has a few tricks that will help you, but for the best tool you can actually get to improve your astrophotography, take a look at the next point.
4 – A new mount for your telescope
This can be a tricky upgrade. The most powerful and technological mounts can be as expensive as a telescope or even more.
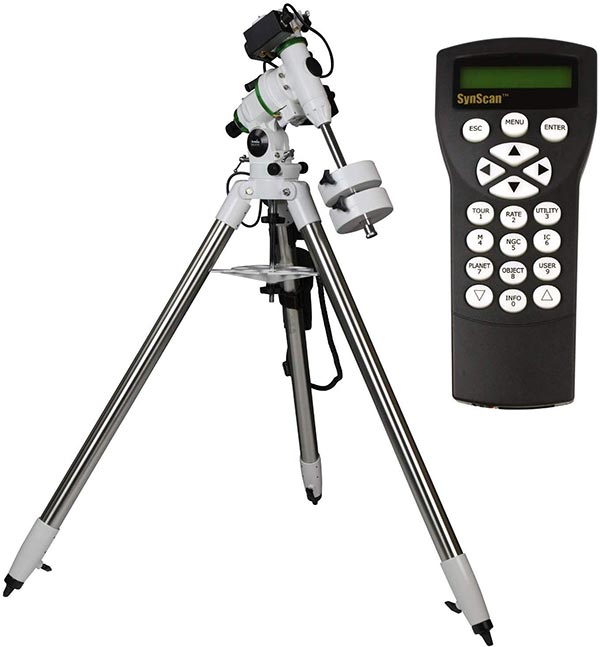
The two most popular types of telescope mounts for amateur astronomers are Alt-Azimuth and Equatorial mounts. Both have their advantages and disadvantages, and while changing from one to the other can have its benefits, it is mostly a lateral move. We are going to focus on a more significant upgrade which moving to a tracking or GoTo mount.
GoTo mounts are wonderful pieces of tech. They are mounts with a small computer attached to them that allow you to pinpoint objects in the sky with more precision, but more importantly, they can automatically track moving objects.
This feature will let you take your astrophotography to the next level. The following video explains the details much better.
There are a few things to consider when upgrading a telescope’s mount. First and foremost you do need to make sure the mount can support your telescope’s weight and size.
The specifications for your mount should make clear the maximum weight it can support.
Enjoyed this article?
Get daily 10-minute PDFs about astronomy to read before bed!
Sign up for our upcoming micro-learning service where you will learn something new about space and beyond every day while winding down.


