
A Barlow lens is a fundamental accessory in every astronomer’s tool belt. It is a very cost-effective way to get access to additional magnification ranges without having to invest big amounts of money.
This is why it can be frustrating when a brand new Barlow lens doesn’t work as expected or when the only thing you are getting from its lens is a blurry or out-of-focus image.
There are a few reasons why a Barlow lens could be giving you trouble. In this article, we will take a look at the most common causes and will show you how to fix them step by step. In most cases the solution is simple, you just need to know what you are looking for.
It is unlikely you have a defective Barlow if you just got it, especially if you purchased it from a reputable manufacturer like Celestron, Orion, Meade Instruments, or Tele Vue.
Problem: Barlow Lens only shows black image
Solution 1
Check if the lens cover hasn’t been removed. No, seriously, some Barlow lenses come with a lens cover to protect them from the dust. While the chances you missed it are low, it only takes you a second to double-check. Go ahead and do it.
Solution 2
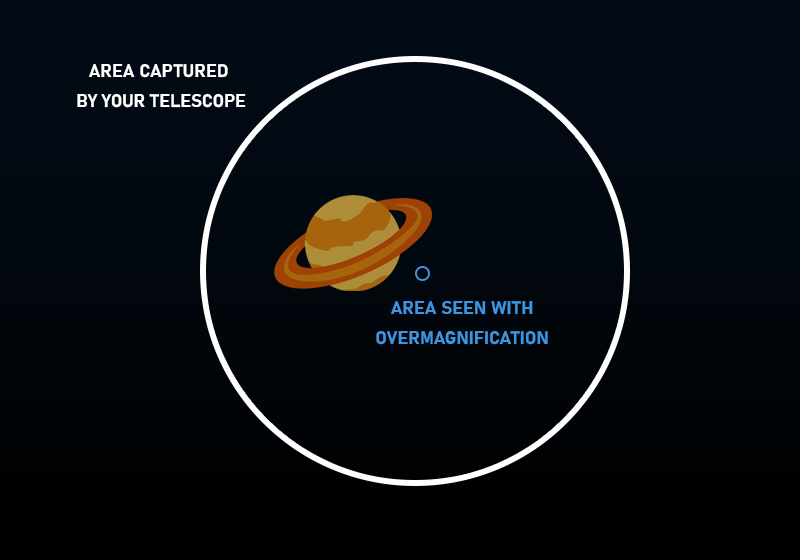
The telescope’s optic system might be overmagnified. That would mean the “black” image you are seeing is actually a tiny area of the dark of space.
Beginner astronomers sometimes don’t know this –because the manufacturers make sure not to mention it in the telescope’s specifications– but the lenses in your device have a maximum useful magnification. It is a number beyond which no matter what magnification your eyepiece/Barlow combination has, you will simply not get a better image or additional details.
If you are exceeding that useful magnification by too much, you will only see a tiny area of the image your telescope is capturing. The following diagram illustrates the problem.
In recent years, manufacturers have included Barlow lenses in telescopes that don’t need them or can’t use them to their maximum potential. All so they can put a ridiculous magnification number in the box like 550x when the telescope in reality only supports a maximum of 140x or something similar.
If your telescope has an aperture of less than 130mm (5″) and for some reason includes a 3x Barlow lens, I’m sorry, but you have fallen victim to the company’s marketing. It doesn’t mean you got a bad telescope, it might be a perfectly awesome product. It just means you have no use for a 3x Barlow.
You can easily test if this is your case by pointing your telescope at an object that is hard to miss (using only an eyepiece) like the Moon or even something on the ground. Remove the eyepiece and set it up in the Barlow. Take another peek and see if you were just seeing space when you were getting a black image.
The solution? Well, unfortunately, it means that particular Barlow will not be very useful to you. In our Barlow lens buying guide, we explain how to calculate the maximum useful magnification of a telescope. Calculate that number and see if maybe a Barlow with a lower magnification can be better for you. You can find some recommendations for lenses that might be a better fit for your needs on that same page.
Solution 3
The more complex Barlows are made of 3 or 4 different lenses. Some of those are on the inside of the unit so if one of them gets damaged, you will not be able to see it like you would if something happened to the outer pieces.
Optics instruments can be fragile and susceptible to fatal damage from falls. If your Barlow is brand new, it is possible it might have gotten damaged during the delivery.
Shake your Barlow gently to try and hear if something is making sounds inside. That can be a sign one of the inner lenses could be broken or out of place.
Any reputable brand should be able to replace the defective unit if that’s the case.
Problem: Barlow lens is showing a blurry or out-of-focus image
For this part, we are going to assume you already tried focusing the image using the focus knob(s) in your telescope. If that’s not the case and you are a first-time user, whip up your device’s manual, find the section that explains how to use that model’s focus knobs, and try that first.
If you have moved the focus knob in every way possible and you still can’t get a clear image, keep reading.
Solution 1: Remove the star diagonal
A star diagonal is the viewing piece at the end of some telescopes. It is used to change the user’s viewing angle and make it more comfortable. They are sometimes simply referred to as “diagonal”. They look something like this:
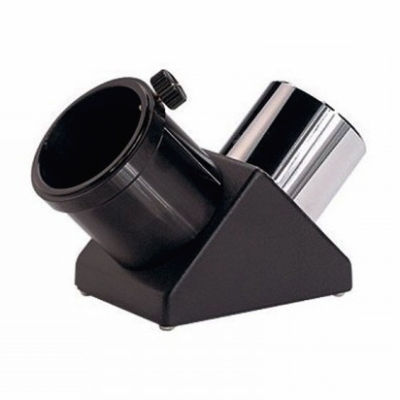
If the telescope you are using has one of these and you are getting an out-of-focus image when using it with a Barlow, try detaching the diagonal and connect the eyepiece/Barlow directly to the telescope.
Your viewing angle will be a bit uncomfortable, but this often fixes the problem.
The out-of-focus image occurs because the diagonals are very simple devices that have a mirror angled at 45 degrees. This adds more “travel” to the image. Barlows tend to work best with smaller travel and taking out the diagonal reduces it, fixing your problem. The same concept applies if you are using an extension tube or “riser” and have a similar issue with focus.
Solution 2: Try it during daylight
When you are still not familiar with new equipment, it can be hard to get the feeling for what direction and how hard you need to turn the focus knob in order to get results. This can be especially hard to grasp at night when you are jumping straight into observing objects in the sky.
Try playing a bit with your telescope during the day first. Focus on faraway objects like cell towers. Then try closer objects like the neighbor’s plants. Try different eyepieces and Barlow combinations.
The point of this exercise is to get to know your equipment. It will give you a more intuitive feel for what you need to do to focus on objects at night.
Solution 3: The slow pull
When it comes to optic instruments, sometimes the smallest changes can be the difference between getting a perfect image and a blurry mess. It also means that if you combine pieces from different manufacturers, the smallest changes in their respective manufacturing processes can affect your image because those two parts most likely weren’t tested with each other during their design.
This is not a common problem. Telescope parts have standard sizes and can be generally mixed together. But if your out-of-focus issue is still persisting at this point, it is worth investigating.
To know if the problem is parts incompatibility, try the following.
- Unlock the Barlow+Eyepiece from your telescope without taking it out.
- View through to the eyepiece
- Slowly take out the Barlow+eyepiece being careful not to poke your eye
If at some point during this process you see the image focus correctly, that means you need a bit more “infocus” a.k.a. distance from the Barlow to the telescope’s connector.
If you identify this as a problem, it can be fixed by using a device called low profile focuser, but to be honest, those are extremely expensive and unnecessary for the amateur astronomer. At that point, it will be cheaper for you to simply get a different Barlow lens.
Wrap up
We hope these tips helped you fix the issues with your Barlow lens. As you can see, for the most part, these problems have easy solutions.
Let us know in the comments if your case didn’t fit into any of the solutions above. We’ll do our best to help you out.
Clear skies!
Enjoyed this article?
Get daily 10-minute PDFs about astronomy to read before bed!
Sign up for our upcoming micro-learning service where you will learn something new about space and beyond every day while winding down.


